ZZ Plant Yellow Leaves: What It Means and How to Fix It

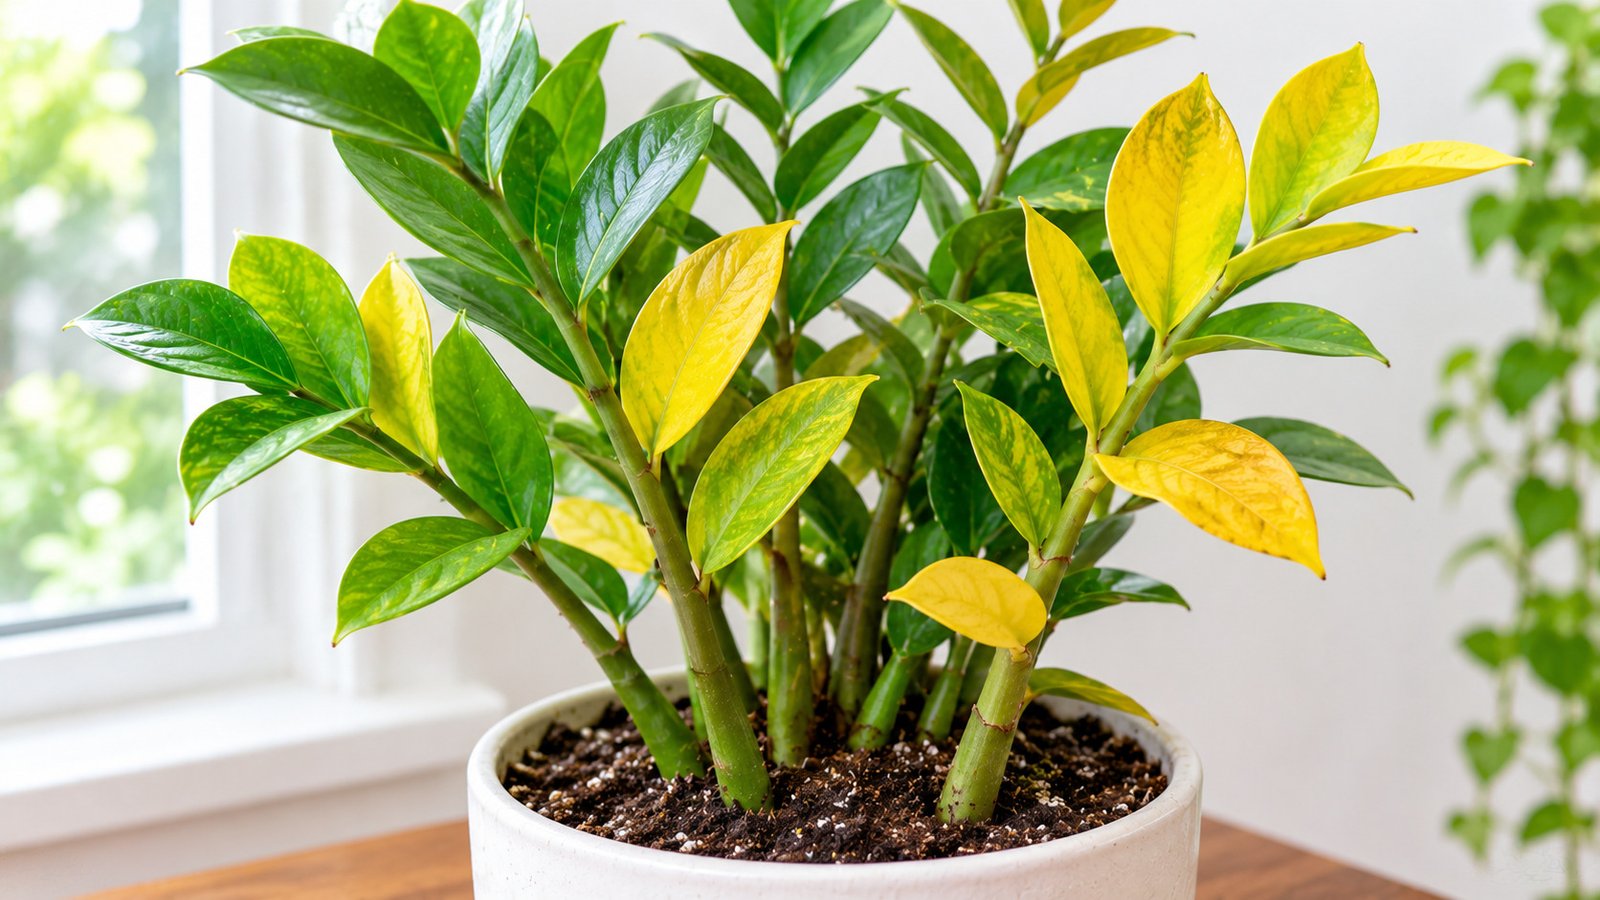
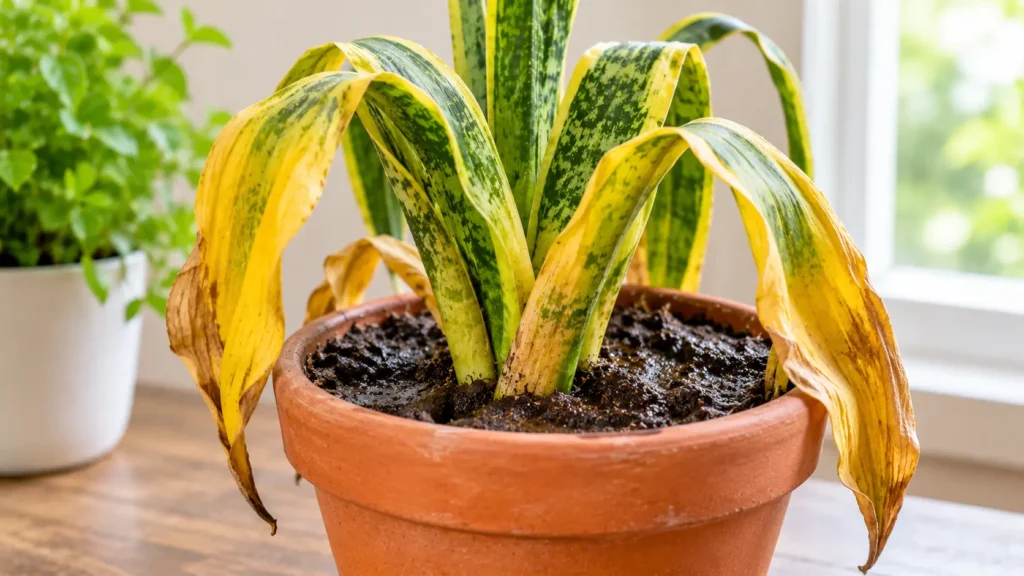
ZZ plant with yellowing leaves on several stems

ZZ plant yellow leaves can be alarming, especially when this is the plant everyone calls almost impossible to kill. Do not worry. A yellow leaf is your plant’s way of telling you that something in its care needs to change, and in most cases the problem is fixable. The key is to work out which cause fits your plant, because the fix depends on the cause. This guide shows you how to diagnose the problem in a few minutes, how to check the rhizomes, and exactly what to do next.

Quick answer: The most common cause is overwatering, which can rot the underground rhizomes. Check the soil first. If it is damp and the base of the stems feels soft, stop watering and inspect the rhizomes.

ZZ Plant Yellow Leaves: The Quick Diagnosis

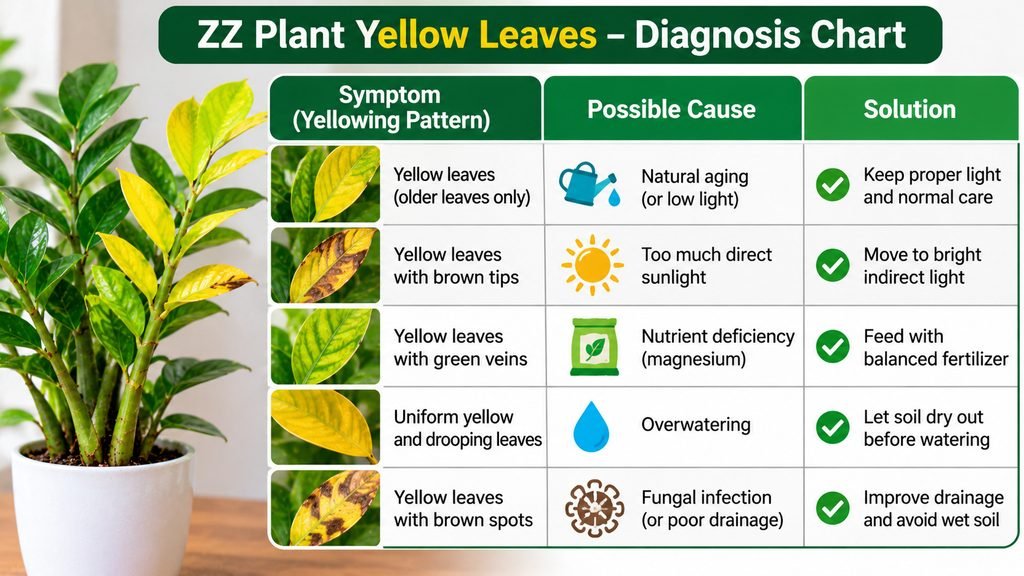
Match what you see to the table below.

What you seeMost likely cause
First thing to try
First thing to try
Several stems yellow at once, soil damp, base softOverwatering or rhizome rotStop watering and check the rhizomes
Slow yellowing of one or two older stems, rest healthyNatural agingNothing to fix
Whitish or yellow patches, curling leaves, near a sunny windowToo much direct sunMove to bright, indirect light
Yellow, wrinkled stems, very dry soil, light potUnderwateringWater thoroughly, then follow the soil test
Yellowing soon after buying, moving or repottingAdjustment stressKeep conditions steady and do not overwater
Yellowing after a cold night or draftCold damageMove away from cold windows and vents
Yellow tips and a white crust on the soilToo much fertilizerFlush the soil and feed less
Chart matching ZZ plant yellow leaf symptoms to causes

First, Check Whether the Yellowing Is Normal

A few ZZ plant yellow leaves on the oldest stems are completely normal. Stems do not live forever, and as the plant sends up new growth, an older stem may slowly turn yellow and fade. If it is only one or two old stems, and the rest of the plant is firm, glossy and pushing out new shoots, there is nothing to fix. Simply remove the yellow stem at the base once it has fully faded.

If many stems are yellowing together, or the yellowing is spreading, move on to the causes below.

8 Common Causes of ZZ Plant Yellow Leaves

Work through these causes in order. The first one is by far the most likely.

1. Overwatering and Rhizome Rot: The Top Cause of ZZ Plant Yellow Leaves

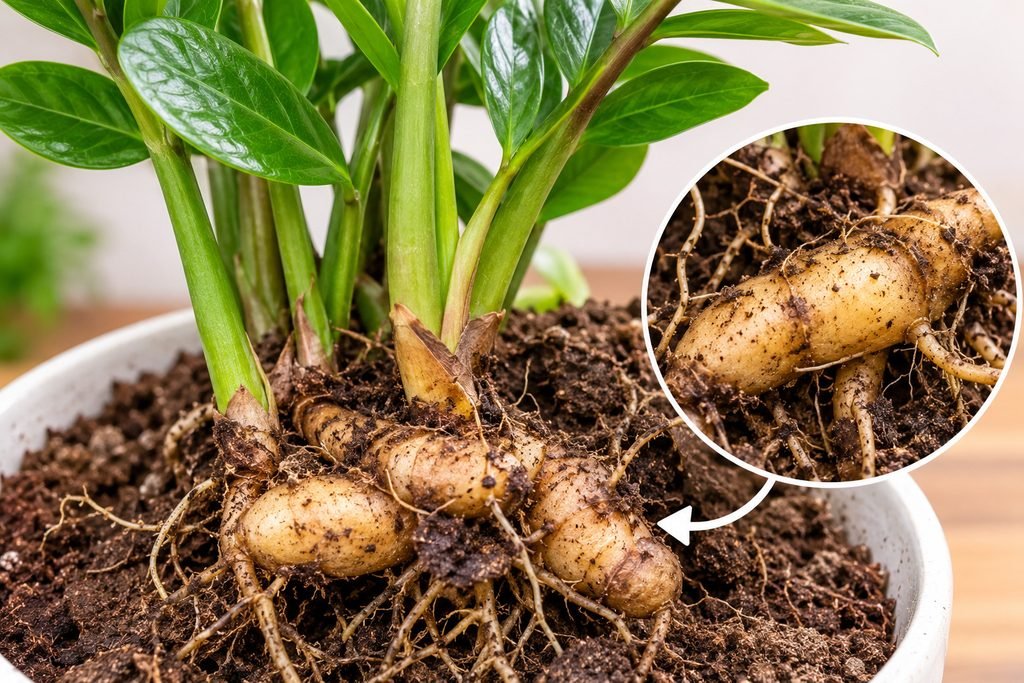
The ZZ plant stores water in thick, potato-like underground stems called rhizomes, so it is built for dry spells. In wet soil the rhizomes and roots rot. You will see several stems turning yellow, the stems may feel soft, and the soil stays damp for days. In bad cases the leaflets drop and the stems collapse at the base.
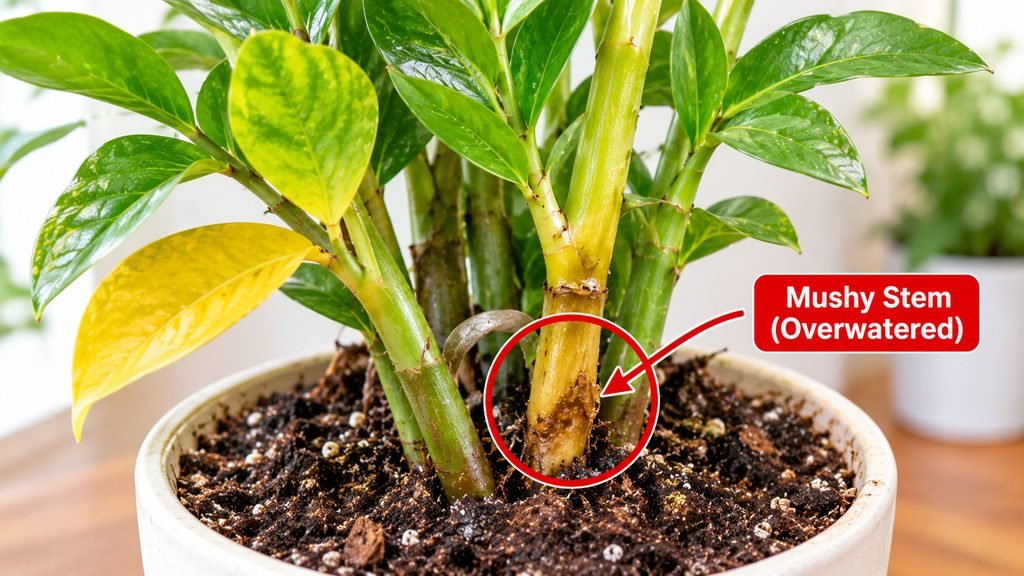
Overwatered ZZ plant with a soft, yellow stem

What to do: Stop watering at once. Take the plant out of its pot and do the rhizome check in the fix section below. For a simple soil test you can use on any drought-tolerant plant, see our guide to How Often to Water a Snake Plant.
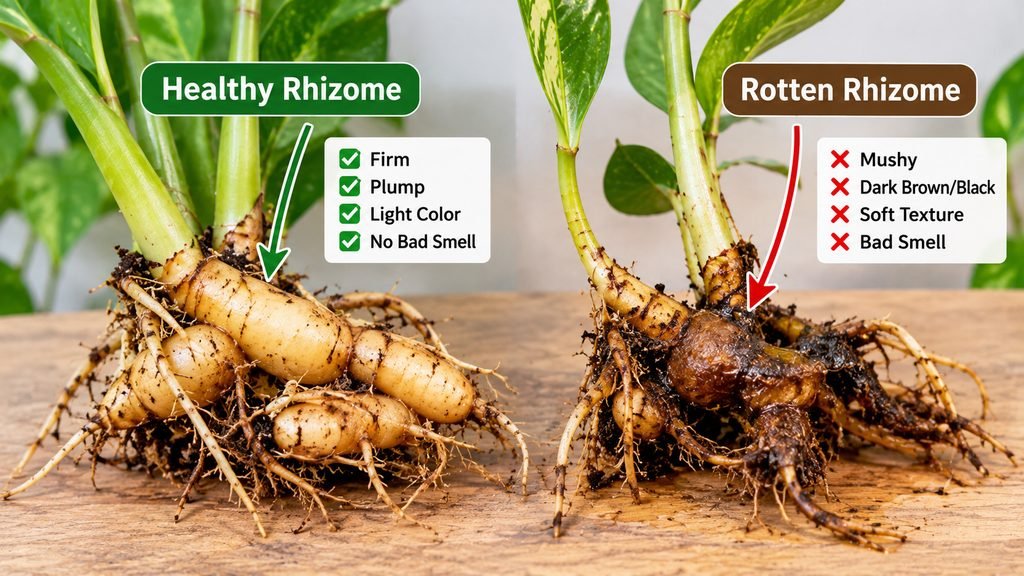
Firm healthy ZZ plant rhizomes next to mushy rotten ones

2. Poor Drainage or Heavy Soil

Even with careful watering, a pot with no drainage hole or a dense, peaty mix keeps the rhizomes wet for too long. Water left in a saucer or decorative outer pot causes the same problem.

What to do: Use a pot with drainage holes, empty the saucer after watering, and switch to a fast-draining mix, such as a cactus mix or regular potting soil lightened with perlite or coarse sand.
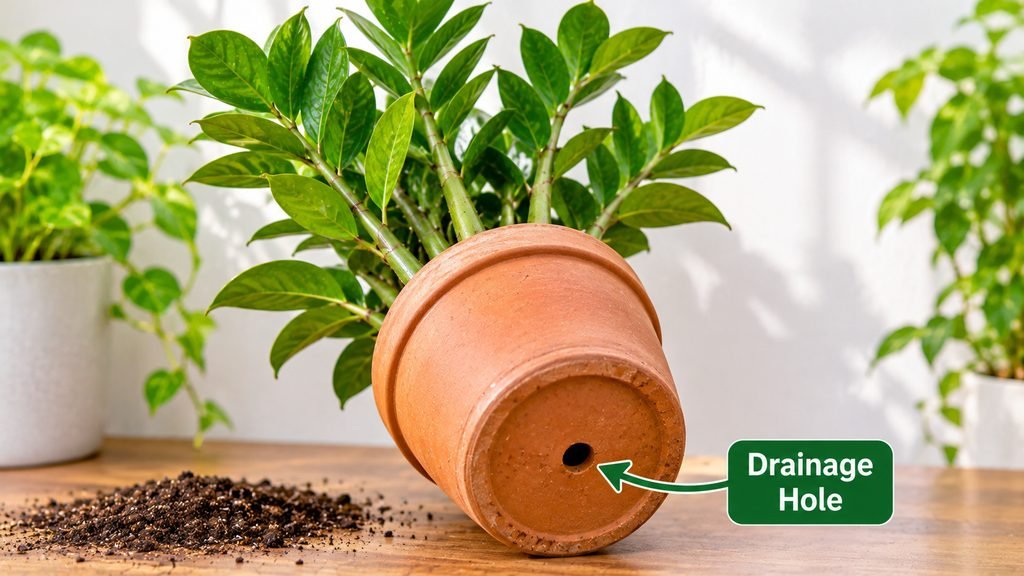
ZZ plant in a pot with a drainage hole

3. Too Much Direct Sun

ZZ plants like bright, indirect light and tolerate low light, but they do not like direct sun. Too much sun can scald the leaves, making them whiten or curl, and the leaves may turn yellow and then brown. The stems may also lean away from the light.
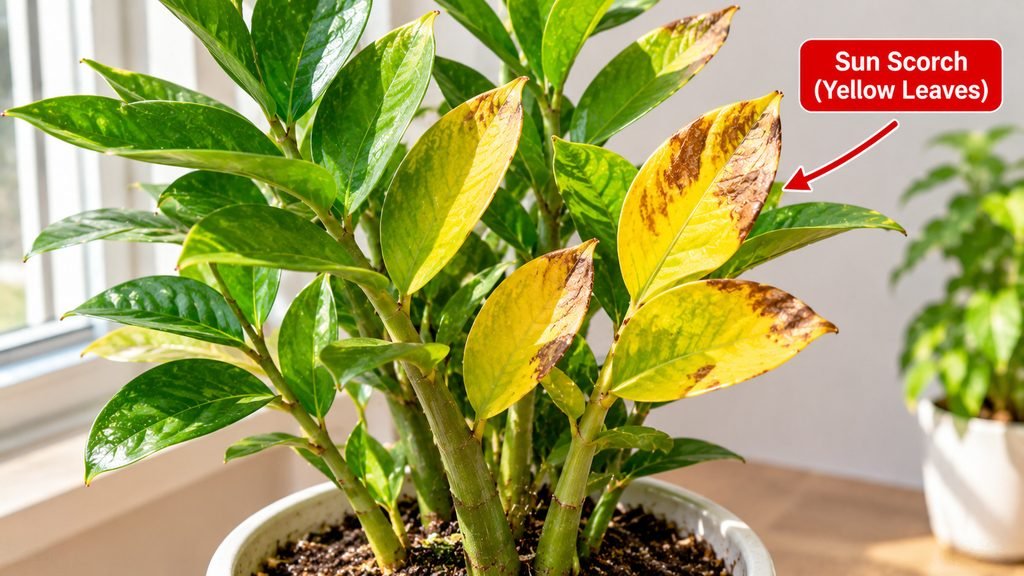
ZZ plant leaves scorched yellow by direct sun

What to do: Move the plant to a spot with bright, indirect light, or filter the sun with a sheer curtain.

4. Underwatering

This is much less common, because the rhizomes hold plenty of water. But if you forget the plant for months, the stems may wrinkle and the leaves may turn yellow and dry. The soil will be bone dry and the pot very light.

What to do: Water thoroughly until water runs out of the drainage holes, then let the soil dry before the next watering. Do not overcorrect by watering too often.

5. Natural Aging

Older stems turn yellow and fade as the plant renews itself. As explained above, this is normal when it is only one or two old stems.

6. A New Home, Repotting or Stress

A newly bought ZZ plant, or one that has just been moved or repotted, can drop or yellow a few leaves while it adjusts to its new light and conditions. A pot that is too large, or fresh soil that stays wet, can also lead to rot after repotting.

What to do: Keep conditions steady, do not overwater, and give the plant a few weeks to settle.

7. Cold Temperatures and Drafts

ZZ plants are tropical and prefer roughly 55 to 80°F (13 to 27°C). Cold windows in winter and drafts from vents or doors can cause yellowing and weak growth. Remember that winter falls in different months depending on where you live, roughly December to February in the Northern Hemisphere and June to August in the Southern Hemisphere.

What to do: Move the plant to a warmer spot, away from cold glass and air conditioning vents.

8. Too Much Fertilizer

ZZ plants need very little feeding. Too much fertilizer builds up salts and can burn the roots, causing yellow leaf tips or edges and sometimes a white crust on the soil.

What to do: Flush the soil with plenty of water so it drains freely, and stop feeding for a while. When you feed, use a balanced houseplant fertilizer at half strength, and only once or twice during the growing season.

Less common: Pests such as scale, mealybugs and spider mites can also cause yellowing, although ZZ plants have few pest problems. Check the undersides of leaves and the stems. Wipe off any pests with a damp cloth.

How to Fix a Yellow ZZ Plant, Step by Step

  1. Check the soil. If it is wet or damp, stop watering immediately.
  2. Look at the stems. Soft, mushy stems point to rot. Firm stems mean the problem may be light or age.
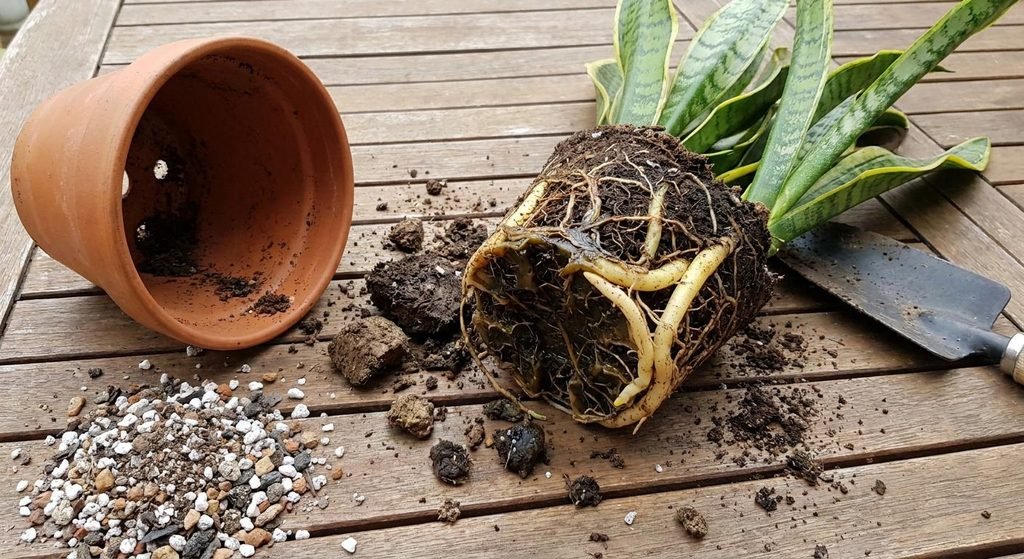
  3. Do the rhizome check. Gently take the plant out of its pot and brush off the soil. Healthy rhizomes are firm, plump and light-colored. Rotten rhizomes are soft, mushy, brown or black, and may smell bad.
  4. Trim the rot. With clean, sharp scissors or a knife, cut away every soft or rotten part. Leave all the firm parts.
  5. Let the cuts dry. Leave the plant out of the soil for a day or so, so the cut surfaces can dry.
  6. Repot in fresh, fast-draining mix in a pot with drainage holes. Use a clean pot or wash the old one.
  7. Wait before watering. Hold off for a week or more, then return to watering only when the soil is dry.
  8. Fix the light and temperature. Aim for bright, indirect light, and normal room temperatures.
  9. Be patient. Recovery is slow. New, healthy shoots are the real sign it worked.

If most of the rhizomes are lost but some healthy leaves or stems remain, you can try rooting them. This is slow, so be patient. Under typical household conditions it can take up to nine months for a new rhizome to start forming from a leaf cutting.

Should You Cut Off Yellow Leaves and Stems?

Do not rush to cut every stem the moment you see ZZ plant yellow leaves. Yellow leaves do not turn green again, but the stem may still be useful if it is firm.

  • Remove a stem if it is completely yellow, soft or mushy. Cut it off as close to the soil (rhizome) as you can.
  • Leave a stem that is only slightly yellow and still firm. It continues to feed the plant.
  • Cut a single yellow leaflet if it bothers you, but the plant does not need it.

Removing damaged stems does not cure the cause. Fix the cause, or the next stem will follow.

How to Prevent Yellow Leaves in the Future

The best way to avoid ZZ plant yellow leaves is to water less than you think you should. These habits help:

  • Water only when the soil is completely dry, and when in doubt, wait. Many growers water roughly every 2 to 4 weeks, and less in winter, but let the soil decide.
  • Use a pot with drainage holes and a fast-draining soil mix.
  • Give bright, indirect light and avoid scorching sun.
  • Keep the plant away from cold drafts.
  • Feed lightly, if at all.
  • Check the stems and soil once a month.

Safety Note for Pets and Kids

ZZ plants belong to the aroid family, many of which contain calcium oxalate crystals that can painfully irritate the mouth and throat. When you trim stems or rhizomes, wash your hands afterwards, and keep the plant and any trimmings out of reach of children and pets.

Frequently Asked Questions

Why does my ZZ plant have yellow leaves but the soil is dry?

Check the rhizomes, because rot can start below the surface. Also consider direct sun, cold, fertilizer, and whether the plant was recently moved. If the stems are wrinkled and the soil is bone dry, it may simply need a deep watering.

Can a ZZ plant recover from yellow leaves?

Yes, as long as the rhizomes are healthy. Fix the cause and wait for new shoots. Yellow leaves themselves will not turn green again.

Why is only one stem turning yellow?

If it is an old stem, it is probably natural aging. If it is a younger stem, check for rot at the base of that stem and for pests.

Why did my ZZ plant turn yellow after repotting?

Repotting can stress the plant and damage the roots. A pot that is too big or fresh soil that stays wet can also cause rot. Let the soil dry out before watering again.

How often should I water a ZZ plant?

Only when the soil has dried out. For most homes that means roughly every 2 to 4 weeks, and less often in winter or low light. When in doubt, err on the dry side.

Final Thoughts

ZZ plant yellow leaves are rarely a death sentence. Start with the soil and the base of the stems, because overwatering and rhizome rot are the usual culprits. Then check light, temperature, fertilizer and recent changes. Fix one thing at a time, be patient, and watch for new shoots.

Related reading: Snake Plant Leaves Turning Yellow, How Often to Water a Snake Plant and Best Low Light Indoor Plants

Iqra Saleem

Founder and Recipe Writer

I am Iqra Saleem, the founder and recipe writer at EatsFromHere. I have over five years of experience in cooking and food, along with an Advanced Diploma in Food Preparation & Cookery Supervision from the Karachi Institute of Culinary Arts (KICA).

Through EatsFromHere, I aim to help home cooks prepare tasty, affordable desi meals with clear instructions and practical guidance. My goal is to make everyday cooking easier for beginners and experienced home cooks alike.

ZZ Plant vs Snake Plant: 7 Differences and Which One to Pick

ZZ plant vs snake plant is the classic showdown between the two toughest houseplants you can buy. Both survive missed waterings, both tolerate dim rooms, and both are recommended to nearly every beginner. But they look different, they like different amounts of light, and they have their own quirks. This guide compares them side by side so you can pick the right one, or decide to grow both.

Quick answer: In the ZZ plant vs snake plant choice, pick the ZZ plant for glossy, arching stems and a spot with no direct sun. Pick the snake plant for upright, sword-like leaves and a brighter spot, even one with a little direct sun. Both are easy, both grow slowly and both are toxic to pets.

ZZ Plant vs Snake Plant at a Glance

FeatureZZ plantSnake plant
Scientific nameZamioculcas zamiifoliaDracaena trifasciata
Plant familyAraceae (arum family)Asparagaceae
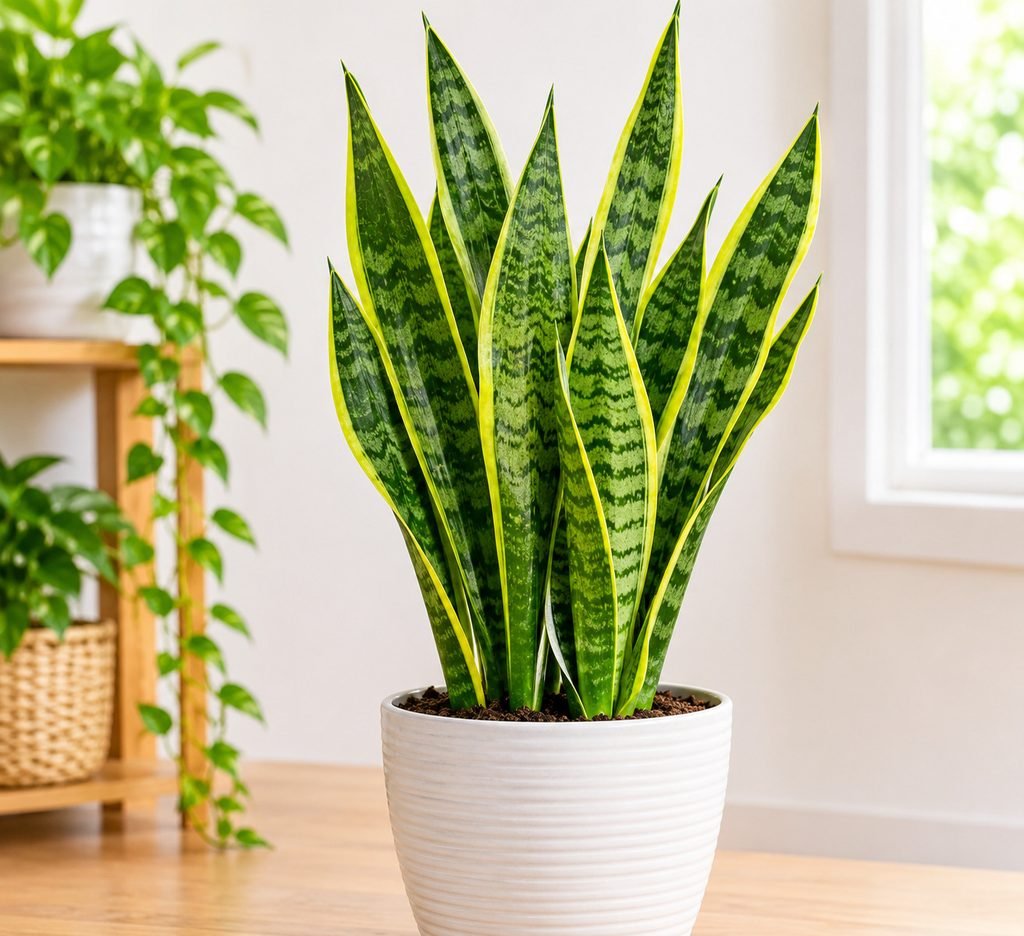
ShapeArching stems with glossy, oval leafletsUpright, stiff, sword-shaped leaves
Water storageThick underground rhizomesThick leaves and underground stems
LightBright, indirect. Tolerates low light. No direct sunBright, indirect. Tolerates low light. Handles some direct sun
WateringSparingly. Let the soil dry. Err on the dry sideOnly when the soil is completely dry
TemperatureAbout 55 to 80°F (13 to 27°C)Normal room temperatures. Avoid below 50°F (10°C)
GrowthSlow to moderateSlow
PetsToxic (calcium oxalate)Toxic (saponins)

Are ZZ Plants and Snake Plants Related?

Not closely. The ZZ plant belongs to the arum family (Araceae), and the snake plant belongs to the asparagus family (Asparagaceae). The ZZ plant is also called Zanzibar gem, eternity plant or Zuzu plant. The snake plant was formerly called Sansevieria trifasciata and is now classed in the genus Dracaena. Both are native to Africa and both evolved to cope with dry spells, which is why their care looks so similar.

7 Key Differences Between ZZ Plants and Snake Plants

In the ZZ plant vs snake plant matchup, the biggest differences are in shape, light and how they store water.

1. Looks and Shape

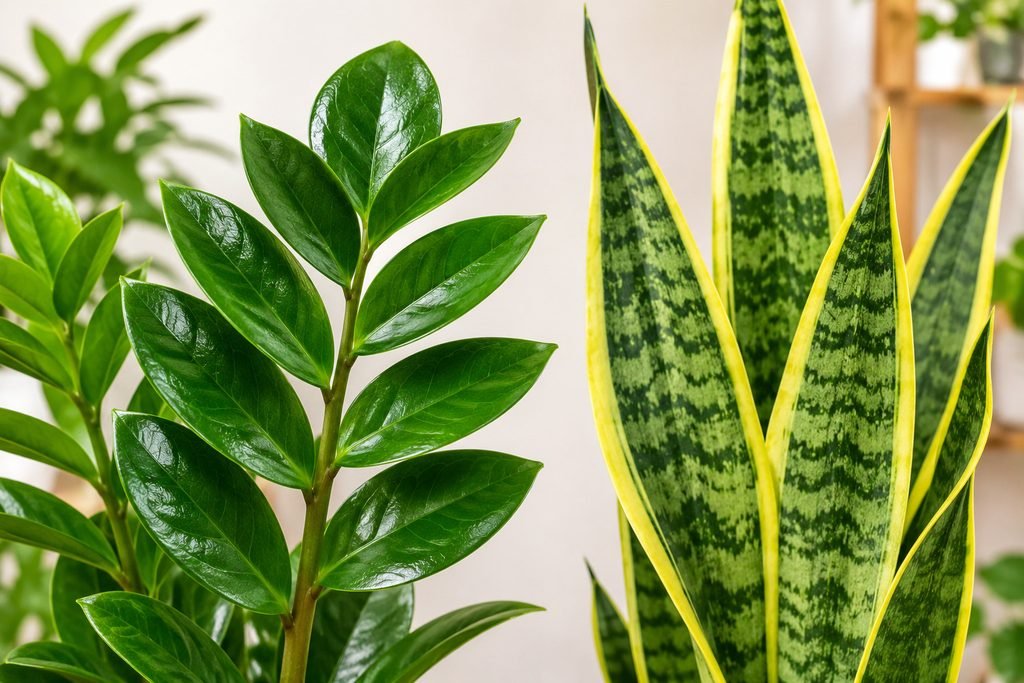
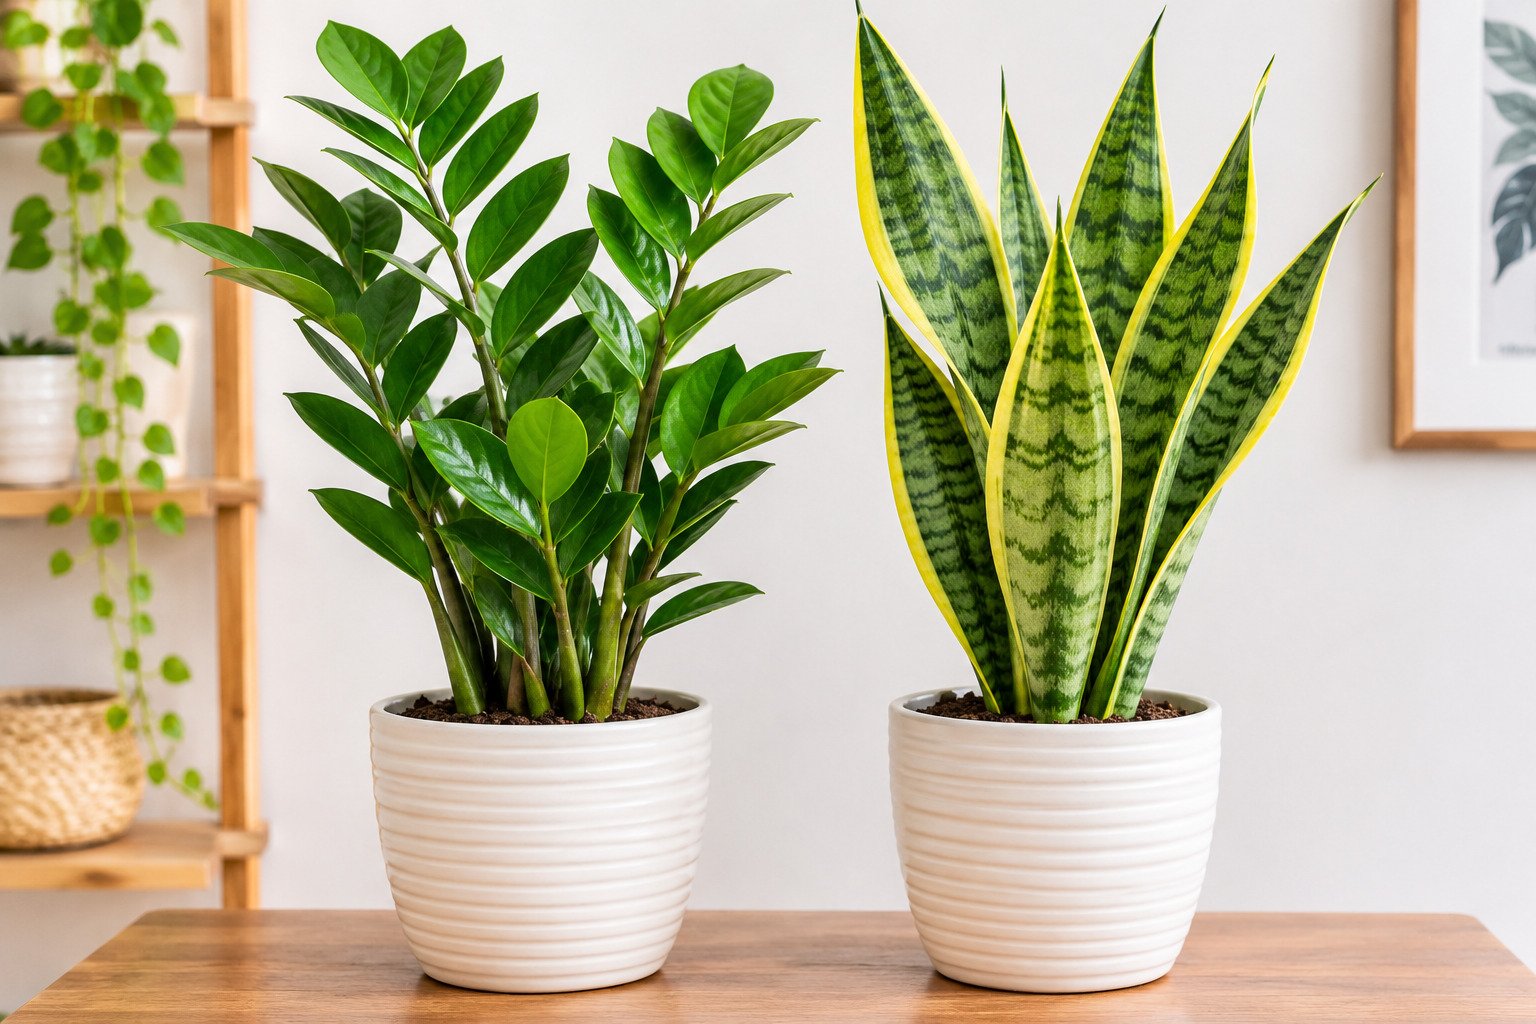
The ZZ plant has graceful, arching stems lined with glossy, dark green oval leaflets, a bit like a feather. The snake plant has tall, stiff, upright leaves that point to the ceiling like swords. The snake plant comes in many types, such as ‘Laurentii’ with yellow edges, ‘Moonshine’ with silvery-green leaves and the compact ‘Hahnii’. The ZZ plant has fewer choices, with the standard green and the almost black ‘Raven’ being the best known. If you prefer a soft, full look, pick the ZZ. If you like clean, vertical lines, pick the snake plant.

Glossy ZZ plant leaflets next to upright snake plant leaves

2. Light

Both plants do best in bright, indirect light and both tolerate low light, although they grow more slowly there. The main difference is sun. The snake plant can handle some direct sun, such as a few hours of gentle morning sun. The ZZ plant is touchier.
Neither plant can live in total darkness, so a windowless room needs a grow light.

3. Watering

Both plants hate wet soil. The ZZ plant stores water in thick rhizomes and should be watered sparingly. Let the soil dry out between waterings, and when in doubt, wait. The snake plant stores water in its thick leaves and underground stems, and should be watered only when the soil is completely dry.

Thick potato-like rhizomes of a ZZ plant

As a rough guide, many people water a snake plant every 2 to 3 weeks and a ZZ plant every 2 to 4 weeks in the growing season, and both less often in winter. Always check the soil first. For a simple soil test, see our guide on How Often to Water a Snake Plant.

4. Temperature and Climate

The ZZ plant likes about 55 to 80°F (13 to 27°C), and the snake plant is happiest in normal room temperatures and should be kept away from anything below about 50°F (10°C). Keep both away from cold windows and drafts. Winter falls in different months depending on where you live, roughly December to February in the Northern Hemisphere and June to August in the Southern Hemisphere. In hot climates, soil dries faster in the warm months, so check it more often.

5. Growth Rate and Size

Both are slow growers, and both grow even more slowly in low light. The ZZ plant spreads slowly and sends up new stems from the rhizomes, and as it ages, its thick stems can push against and eventually crack a pot. The snake plant grows upright and sends up new leaves and pups, and its height depends on the type, from a few inches to several feet.

6. Propagation

The easiest way to propagate either plant is by division when you repot. Separate the rhizomes or pups and plant them in their own pots. You can also use leaf cuttings, but the ZZ plant is very slow here. Under indoor household conditions, a new rhizome can take up to nine months to form from a ZZ leaf cutting. Snake plant leaf cuttings root faster, but remember that variegated types such as ‘Laurentii’ usually grow back plain green from leaf cuttings, so use division for those. See our Snake Plant Care guide for steps.

7. Common Problems

Overwatering is the main problem for both, but it shows up a little differently. A ZZ plant usually turns yellow and the rhizomes rot. A snake plant usually gets soft, mushy leaves and a soft base. Our guides on ZZ Plant Yellow Leaves and Snake Plant Leaves Turning Yellow show how to diagnose and fix each one. Both have few pest problems, but check the leaves now and then.

Which Is Better: ZZ Plant vs Snake Plant for Your Home?

Neither is better in every case. Use this guide:

Choose the ZZ plant if…Choose the snake plant if…
You want a glossy, full, arching lookYou want upright, architectural lines
Your light is indirect and there is no direct sunYou have a brighter spot, or some direct sun
You often forget to waterYou want more variety in leaf color and size
You have space for a wider plantYou have a narrow corner or a small footprint

ZZ Plant vs Snake Plant in Low Light

Both survive in low light, so either is a good choice for a dim room. Expect slow growth from both. Variegated snake plants lose some of their pattern in low light. In either case, water less, because the soil stays wet longer. See our Best Low Light Indoor Plants list for more ideas.
For Bedrooms and Offices

Both work well, because they are quiet, tidy and need little care. The snake plant’s upright shape suits narrow desks and corners, and the ZZ plant suits a table or floor spot where it has room to spread.

Snake plant with tall upright sword-shaped leaves

For Homes With Pets

Neither is a safe choice. See the next section.

Are ZZ Plants and Snake Plants Toxic to Pets?

Yes, both are. When it comes to ZZ plant vs snake plant and pets, neither is the pet-safe option, but the reasons differ. ZZ plants are in the arum family, and many members of this family contain calcium oxalate crystals that can painfully irritate the mouth and throat. Snake plants contain saponins, which the ASPCA says can cause nausea, vomiting and diarrhea in cats and dogs. Keep both out of reach of pets and small children, and wash your hands after pruning or trimming. If your pet eats some, contact your vet or an animal poison control service.

Frequently Asked Questions

Can I plant a ZZ plant and a snake plant in the same pot?

They like similar dry conditions, so it can work. But ZZ rhizomes spread and push against the pot, and the plants compete for space. Separate pots are easier and safer for both.

Which one grows faster?

Both are slow. Growth depends mostly on light and care. The ZZ plant is usually described as slow to moderate, and the snake plant as slow.

Which is easier for a beginner?

They are about equal. If you tend to overwater, pick either one, but water carefully. If you have a dim room with no direct sun, the ZZ plant is a safe choice. If you have a bright spot with some sun, the snake plant is a better match.

Do ZZ plants and snake plants clean the air?

Not in any meaningful way in a normal home. The idea comes largely from a 1989 NASA study in small, sealed chambers. Later research suggests ordinary ventilation matters far more than a few houseplants. Grow them for their looks and easy care.

Which is safer for pets?

Neither. Both are toxic, so keep them out of reach.

Final Thoughts

ZZ plant vs snake plant comes down to looks, light and space. Both are forgiving, slow-growing and nearly impossible to kill, as long as you do not overwater them. Choose the one that fits your light and your style, check the soil before every watering, and keep both away from curious pets.

Related reading: LINK: Snake Plant Care, ZZ Plant Yellow Leaves and LINK: Best Low Light Indoor Plants
Pothos propagation is one of the easiest and most satisfying things you can do with a houseplant. With a pair of clean scissors, a jar of water and a little patience, you can turn one long vine into several new plants, for free. This guide shows you exactly where to cut, how to root cuttings in water or soil, when to move them into a pot, and what to do if your cuttings turn yellow or start to rot.

Quick answer: Cut a vine just below a node (the small bump where a leaf and root grow), keep two to four leaves on a 4 to 6 inch (10 to 15 cm) cutting, and place the node in water or moist soil in bright, indirect light. Roots usually appear in a few weeks.

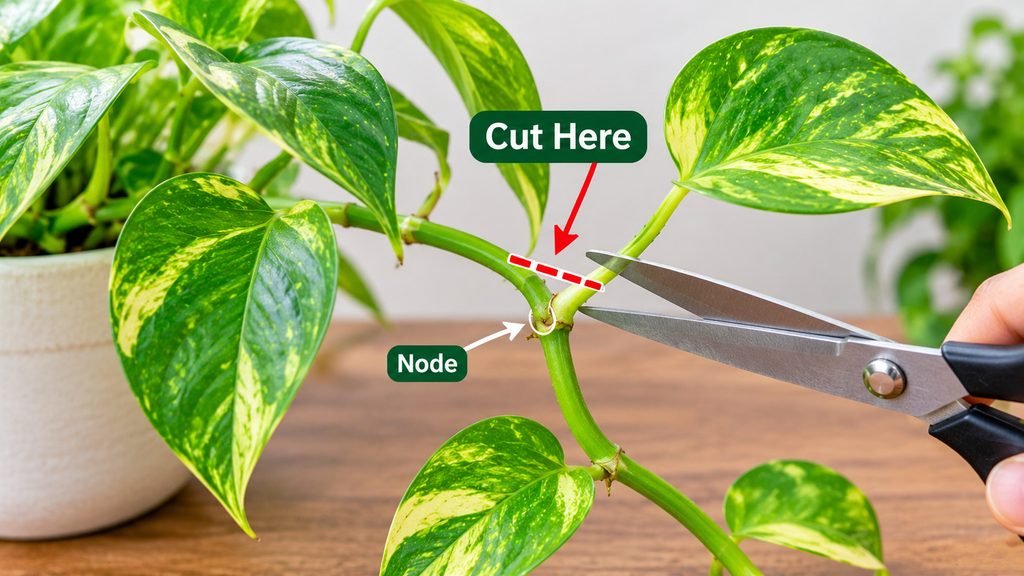
Pothos vine with the node marked where to make a cut

Pothos Propagation at a Glance

  1. Choose a healthy vine from a mature plant.
  2. Find the nodes. They are the small brown bumps along the stem.
  3. Cut just below a node, making a cutting 4 to 6 inches (10 to 15 cm) long with 2 to 4 leaves.
  4. Remove the lowest leaf, so no leaf sits under the water.
  5. Root it in a jar of water, or plant it in moist, well-draining soil.
  6. Place it in bright, indirect light, away from direct sun.
  7. Wait for roots, usually a few weeks.
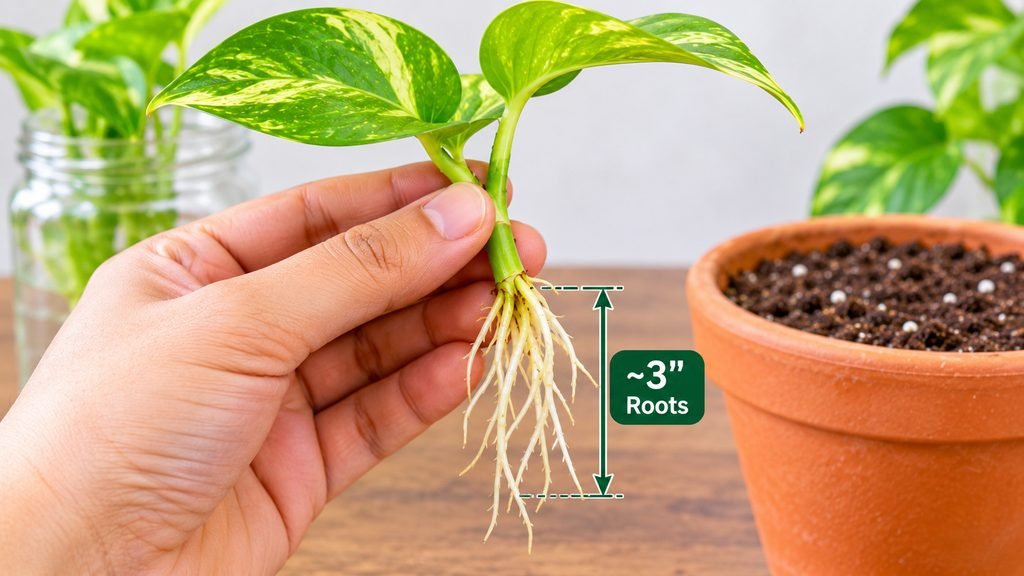
  8. Pot it up once water roots are 2 to 3 inches (5 to 8 cm) long.

What You Need Before You Start

  • A healthy, growing pothos with long vines.
  • Sharp, clean scissors or pruners (wipe the blades with rubbing alcohol first).
  • A clear glass jar or bottle for water rooting. A clear jar lets you watch the roots.
  • Room-temperature water.
  • A small pot with drainage holes and a well-draining potting mix, if you are rooting in soil.
  • Optional: rooting hormone. Pothos roots easily without it.

Where to Cut Pothos for Propagation

The most important rule in pothos propagation is to include a node. A node is a small bump on the stem, usually where a leaf joins the vine. It is also where the aerial roots grow from. Without a node, a cutting cannot make roots or new growth.

How to cut:

  1. Look along the vine and find a node with a leaf attached.
  2. Cut about 1/4 inch (6 mm) below the node.
  3. Make the cutting 4 to 6 inches (10 to 15 cm) long, with 2 to 4 leaves and at least 2 nodes if possible.
  4. Pull off or snip the lowest leaf, so the bottom node is bare and ready to go in water or soil.

The best time to take cuttings is spring and summer, when the plant is growing fast. You can propagate in other seasons, but rooting is slower.

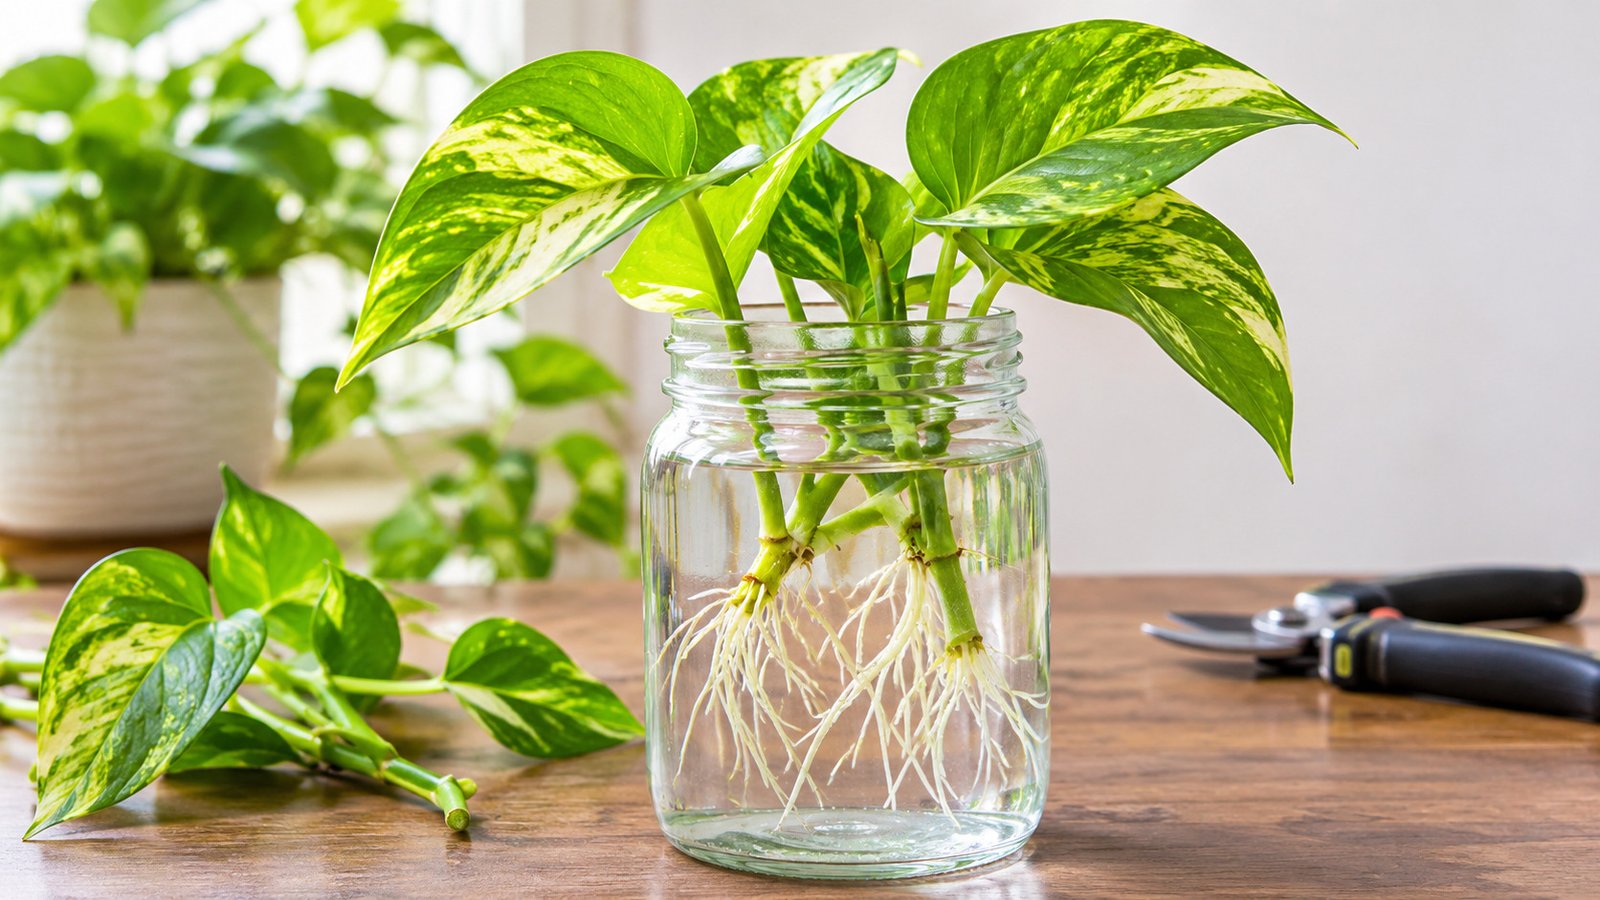
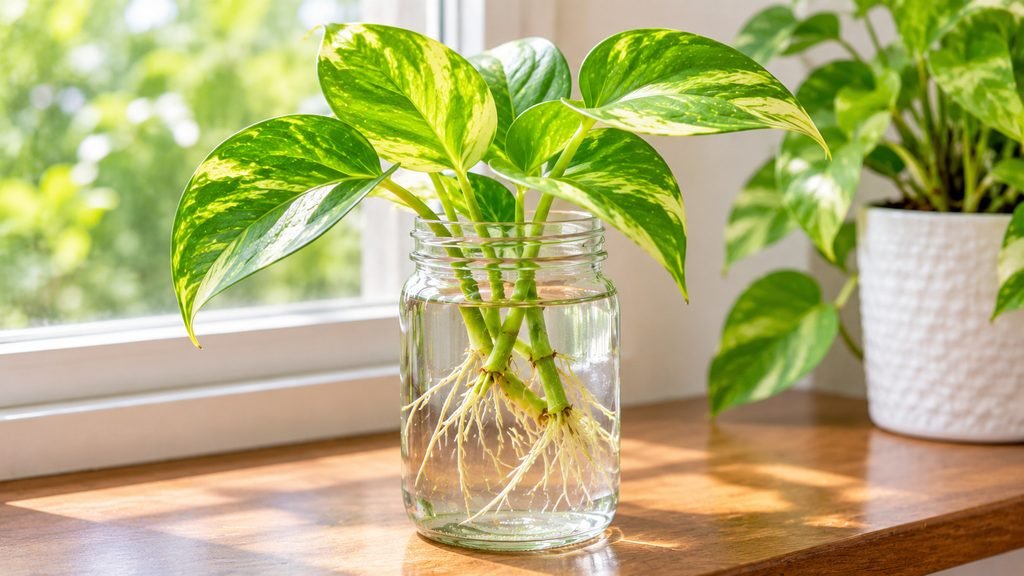
Pothos cuttings in a jar of water near a bright window

How to Propagate Pothos in Water, Step by Step

  1. Fill a clear jar with room-temperature water.
  2. Place the cutting so that the bare node or nodes are under the water and the leaves stay above it.
  3. Put the jar in bright, indirect light. Avoid direct sun, which can overheat the water and encourage algae.
  4. Change the water every week or two, or sooner if it looks cloudy. Fresh water keeps the roots healthy.
  5. Wait. Small white roots often appear in one to three weeks. It can take longer in cool rooms or dim light.
  6. Let the roots grow to about 2 to 3 inches (5 to 8 cm) before potting, as explained below.

If you want a plant that looks full from the start, root several cuttings in the same jar.

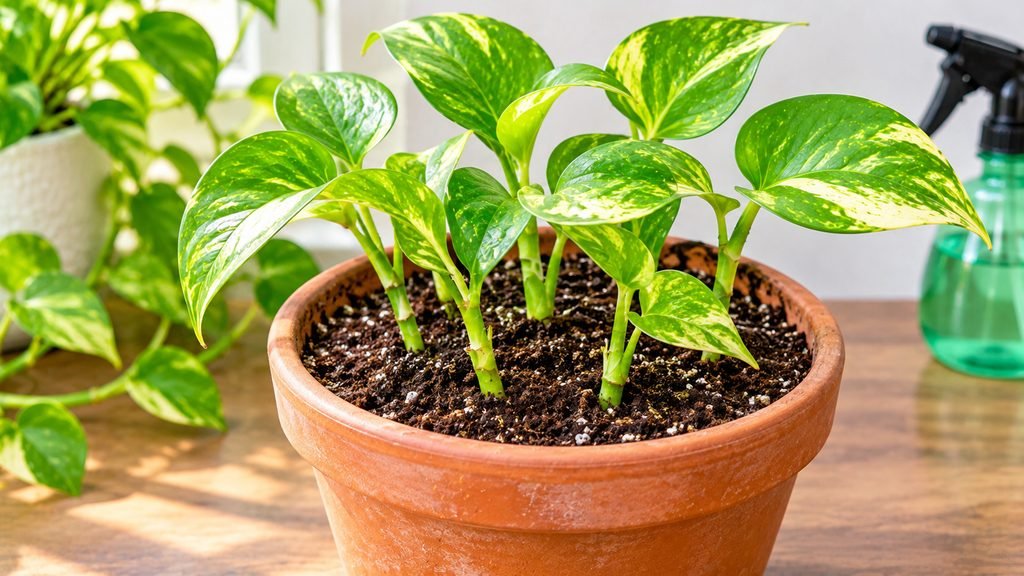
Several pothos cuttings planted in a small pot of soil

How to Propagate Pothos in Soil

You can skip the jar completely and root cuttings straight in soil.

  1. Fill a small pot with a light, well-draining mix and moisten it.
  2. Make a hole with a pencil and insert the cutting so at least one node is below the soil.
  3. Firm the soil gently around the stem. For a fuller plant, use 3 to 5 cuttings in a 6 inch (15 cm) pot.
  4. Keep the soil lightly moist, not soggy.
  5. Place the pot in bright, indirect light.
  6. Wait for roots. This usually takes several weeks. A gentle tug that meets resistance, or new leaf growth, means roots have formed.
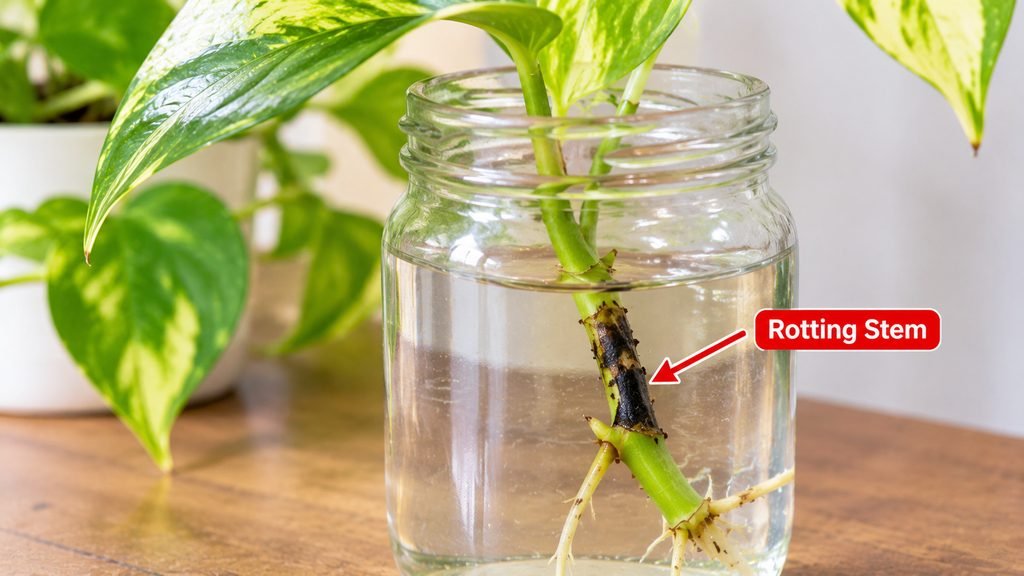
Pothos cutting with a black, rotting stem in water

Water or Soil: Which Is Better?

Both methods work. The best pothos propagation method depends on what you prefer.

Which is BetterWaterSoil
Easy to watch rootsYesNo
Needs transplanting lateYesNo
Risk of rotHigher if the water is not changedHigher if the soil is too wet
Good forBeginners and kids who like to see rootsA faster move to a long-term pot

Water roots are a little different from soil roots, so plants moved from water to soil may need a short adjustment period. Cuttings rooted directly in soil skip that step.

When and How to Move Pothos Cuttings From Water to Soil

Wait until the roots are about 2 to 3 inches (5 to 8 cm) long. Very short roots can struggle after the move.

  1. Use a pot with drainage holes and fresh, well-draining potting mix.
  2. Plant the cutting so the roots are covered and the lowest node is under the soil.
  3. Water lightly and keep the soil evenly moist, not wet, for the first few weeks.
  4. Give bright, indirect light. A few drooping leaves in the first week are normal.
  5. Hold off on fertilizer for the first month.

Once new leaves appear, you can switch to a normal pothos routine. Let the top 1 to 2 inches (2.5 to 5 cm) of soil dry between waterings.

Pothos cutting with roots about 3 inches long ready for potting

Common Pothos Propagation Problems and Fixes

Most problems come from rot, poor light or the wrong cut. Here is how to fix them.

Cuttings Turning Yellow

A yellow leaf on a new cutting is common. The usual causes are a leaf sitting under the water (remove it), strong direct sun, very low light, or an older leaf that is simply giving up its energy to the rest of the cutting. Remove yellow leaves, change the water and move the cutting to bright, indirect light. If the whole cutting turns yellow and soft, look for rot (see below).

Roots or Stems Turning Brown or Black

Black, mushy or slimy stems, cloudy water or a bad smell mean rot. To rescue the cutting:

  1. Take it out and rinse it.
  2. Cut off the rotten part, going back to firm, green tissue that still has a node.
  3. Wash the jar and use fresh water.
  4. Change the water more often from now on.

Cuttings in soil rot when the soil stays too wet, so let the top layer dry slightly between waterings.

Cuttings Not Rooting

If nothing is happening after several weeks, check these:

  • No node. A cutting without a node will not root properly.
  • Too cold. Rooting slows down in cool rooms. Aim for normal room temperatures.
  • Too little light. Move it to a brighter spot, without direct sun.
  • Wrong season. Cuttings taken in winter are slower.
  • Not enough time. Some cuttings take longer than others.

Pothos Propagation Without Leaves or Nodes: What Works?

A node is essential. A piece of vine with a node but no leaves can still root in water or soil, though it is usually slower and less reliable than a cutting with a leaf. A piece of stem with no node will not make a new plant. A single leaf with no stem or node may grow a few roots, but it will not grow a new vine. If you have a bare vine with nodes, try it in water and be patient.

Safety Note for Pets and Kids

Pothos propagation is simple, but pothos is toxic to cats and dogs, and the sap can irritate skin and mouths. Keep cuttings, jars and trimmings out of reach of pets and small children, and wash your hands after pruning. For more on pet safety, see our [LINK: Pothos vs Philodendron] guide.

Frequently Asked Questions

How long does it take to propagate pothos?

In warm, bright conditions, roots often appear in one to three weeks, and a cutting is ready to pot a couple of weeks later. It can take longer in cool or dim rooms.

Can pothos live in water permanently?

Yes. Many pothos grow in water for a long time if you change the water regularly. Some growers add a tiny amount of diluted houseplant fertilizer now and then. A plant moved to soil usually grows faster and fuller.

Do I need rooting hormone?

No. Pothos roots easily without it, so it is optional.

Can I propagate any type of pothos?

Yes. Golden, marble queen, neon, jade and other types all root the same way. Variegated types need bright, indirect light to keep their patterns.

What is the best time to propagate pothos?

Spring and summer, when the plant is growing actively. Heartleaf philodendron roots the same way, so you can use these steps for it too.

Final Thoughts

Pothos propagation comes down to a few simple rules: cut just below a node, keep the cutting in bright, indirect light, keep the water fresh or the soil lightly moist, and be patient. Within a few weeks you will have healthy new roots, and soon a brand-new plant to keep or share.

Related reading: Pothos vs Philodendron: 5 Easy Ways to Tell the Difference, Best Low Light Indoor Plants and Snake Plant Care
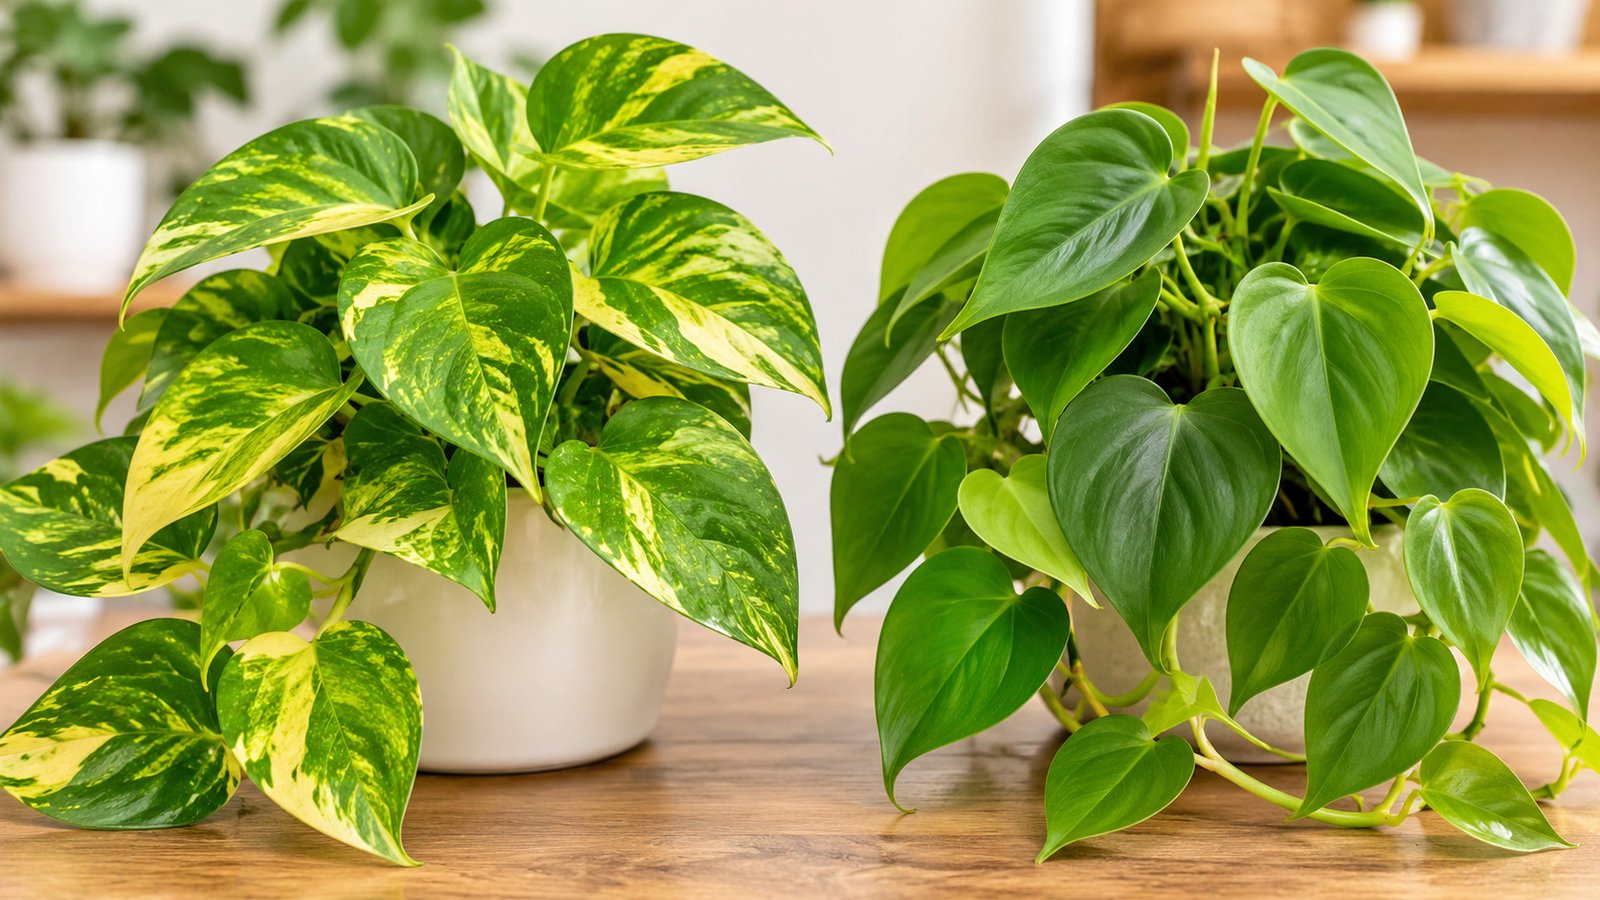
Pothos vs philodendron is one of the most common mix-ups in the houseplant world. Both have heart-shaped leaves, both trail and climb, and both are often sold under confusing labels, so it is easy to bring one home and wonder which it really is. The good news is that you can tell them apart with a few simple checks, and their care is almost the same. This guide gives you five easy tests, a side-by-side comparison, care tips and what you need to know about pets.

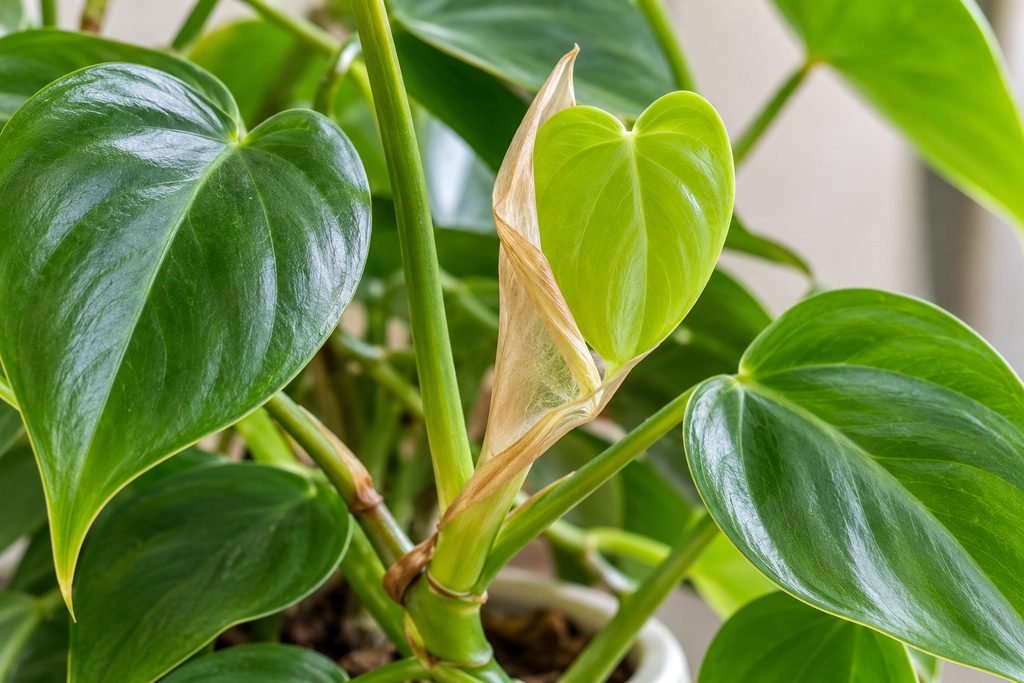
Quick answer: Look at a new leaf. A philodendron’s new leaf grows out of a thin, papery sheath called a cataphyll, which later dries up and falls off. A pothos has no sheath, and its new leaf simply unrolls from the stem. Pothos leaves are also thicker and waxier, while heartleaf philodendron leaves are thinner, softer and more evenly heart-shaped.

Heartleaf philodendron new leaf emerging from a papery cataphyll sheath.

Pothos vs Philodendron at a Glance

FeaturePothos (Epipremnum aureum)Heartleaf philodendron (Philodendron hederaceum)
Leaf textureThicker, waxy, glossyThinner, softer, matte
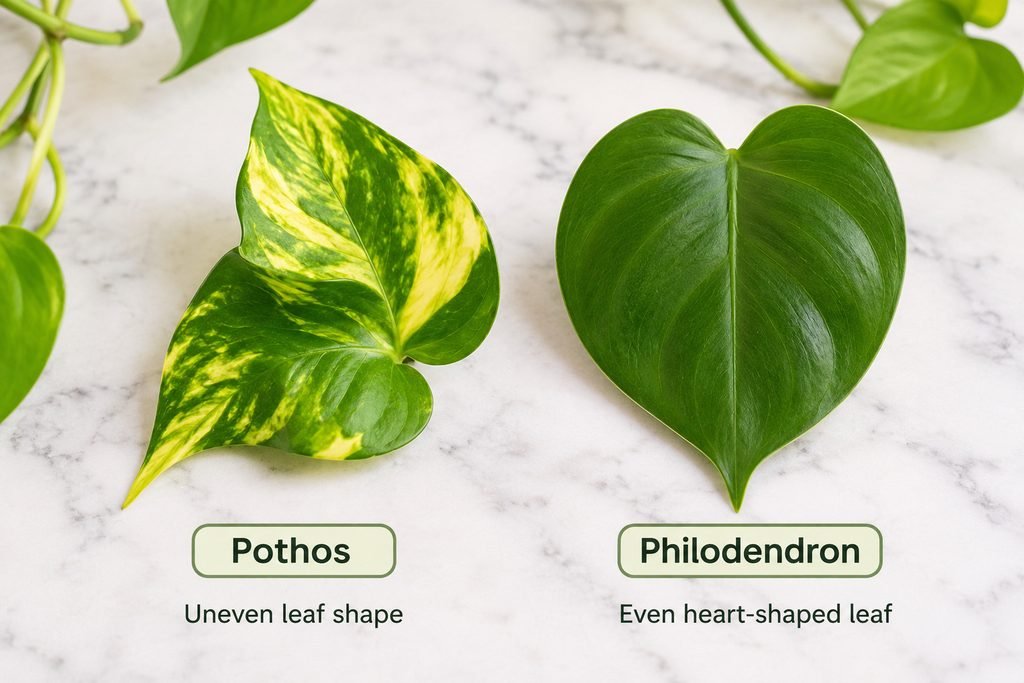
Leaf shapeSlightly rounded, often a little uneven at the baseMore evenly heart-shaped, with a pointed tip and a deeper notch
New leafUnrolls from the stem, with no sheathEmerges from a papery cataphyll that dries and falls off
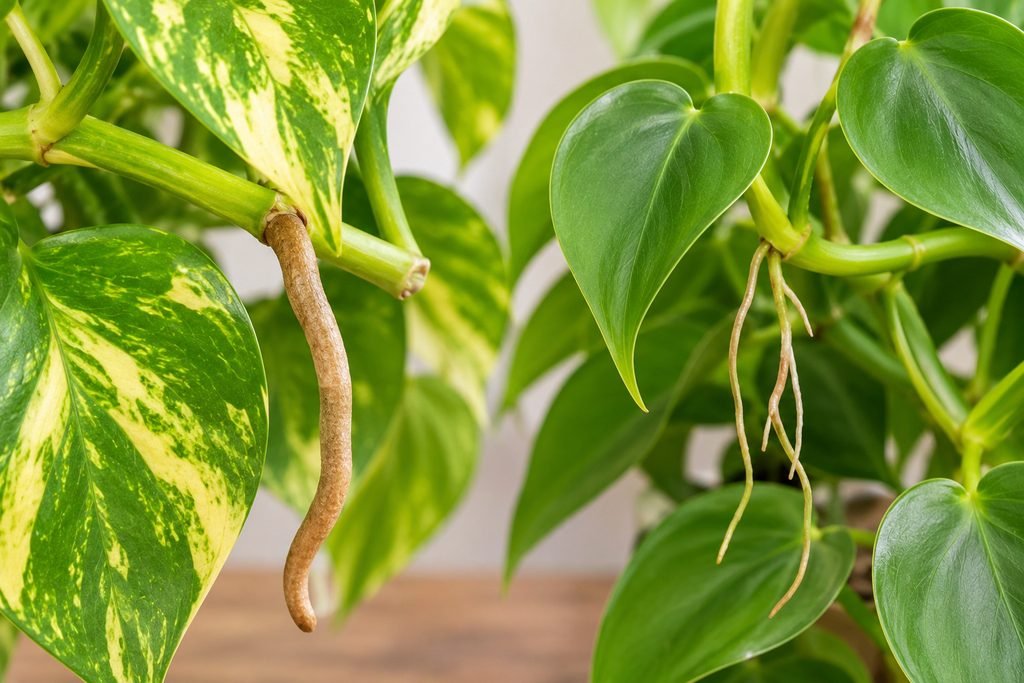
Aerial rootsThick and stubby, usually one per nodeThinner and stringy, often two or more per node
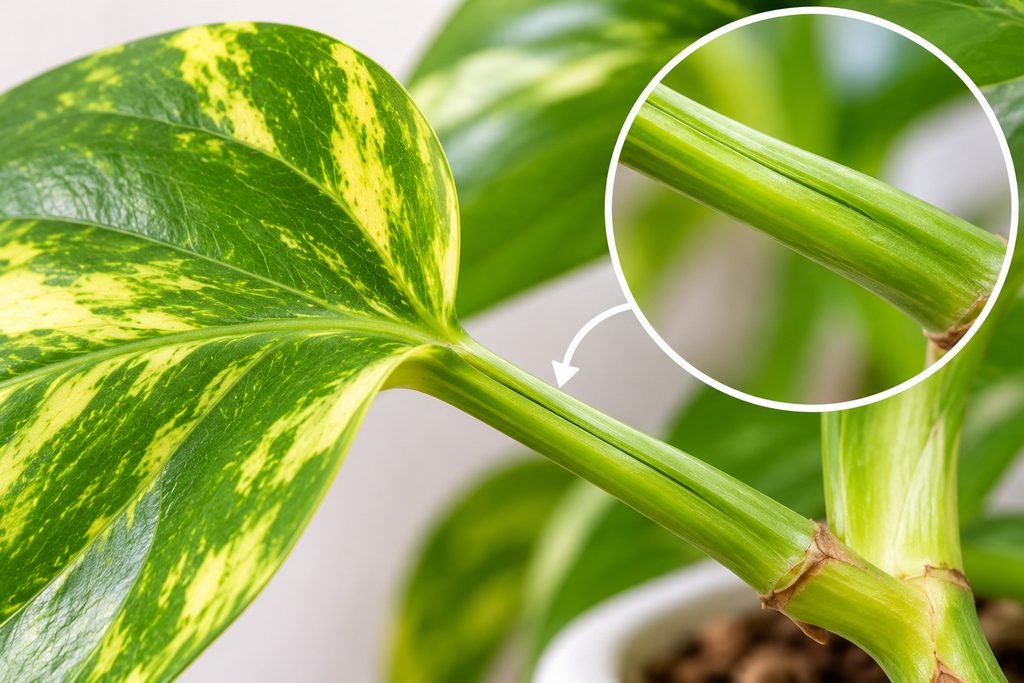
Leaf stem (petiole)Thicker, with a groove along itThinner and smoother
Common looksOften variegated (yellow, white, marbled)Often solid green, with some lime or bronze types
CareVery easyVery easy, almost the same
PetsToxic to cats and dogsToxic to cats and dogs

Are Pothos and Philodendron the Same Plant?

No. They belong to the same plant family, Araceae (the arum family), but they are different genera. Pothos is Epipremnum aureum, also called golden pothos or devil’s ivy. When people say philodendron, they usually mean the heartleaf philodendron, Philodendron hederaceum. In older sources and on some plant labels it may still appear as Philodendron cordatum or scandens.

The Philodendron genus is huge, with many shapes and sizes, including big, split-leaf types. In this guide we compare pothos with heartleaf philodendron, because that is the one most often mistaken for it. One more thing: the plant sold as “satin pothos” is actually a different plant, Scindapsus pictus.

When comparing pothos vs philodendron, remember that shops mislabel them often, so the tests below are more reliable than the plant tag.

5 Easy Ways to Tell Pothos From Philodendron

No single test is perfect on its own, especially on young or variegated plants. Use two or three together.

1. Look at the Leaf Texture

Pothos leaves are thicker and waxier, with a glossy, almost plastic feel. Heartleaf philodendron leaves are thinner and softer, with a matte finish that looks more like fabric. Gently touch a leaf and compare.

2. Check the Leaf Shape

Both leaves are heart-shaped, but pothos leaves are usually a little rounder and uneven, with a base that can look slightly lopsided. A heartleaf philodendron leaf is more evenly heart-shaped, with a deeper notch where the stem joins and a longer, more pointed tip.

Thick pothos aerial root compared with the thinner aerial roots of a heartleaf philodendron.

3. Look for a Cataphyll (the Surest Test)

This is the test most plant lovers trust. A cataphyll is a small, modified leaf that wraps around each new leaf on a philodendron. It looks like a papery, pale green or brown sleeve near the newest growth, and it eventually dries up and falls off. A pothos does not have one. Its new leaf simply unrolls from the stem. If you see the papery wrapper, it is a philodendron. If you never do, it is almost certainly a pothos.

4. Compare the Aerial Roots

Both plants grow aerial roots from their stems, which help them climb. On a pothos, they are usually thick and stubby, and there is typically one at each node (the bump on the stem where a leaf grows). On a heartleaf philodendron, they are thinner and stringier, and you will often see two or more at one node.

Close-up of a golden pothos leaf stem showing its distinctive longitudinal groove.

5. Feel the Leaf Stem

The petiole is the small stem that joins the leaf to the vine. On a pothos, it is thicker and has a groove running along it. On a philodendron, it is thinner and smoother.

Pothos leaf with an uneven shape next to a philodendron leaf with a symmetrical heart-shaped structure.

Pothos vs Philodendron Care: Are They Different?

For most home growers, the care is nearly identical. Both are tough, forgiving and great for beginners.

  • Light: Bright, indirect light is best. Both tolerate lower light, but growth slows.
  • Water: Water when the top 1 to 2 inches (2.5 to 5 cm) of soil are dry, and let the extra water drain. Overwatering is the main cause of problems. Checking the soil before every watering is a habit worth building. See our [LINK: How Often to Water a Snake Plant] for a simple soil test you can use here too.
  • Soil and pot: A well-draining potting mix and a pot with drainage holes.
  • Temperature and humidity: Normal room temperatures are fine. Keep both away from cold drafts. Average household humidity is enough, and a little extra can help the leaves look their best.
  • Feeding: Light feeding in spring and summer is plenty.
  • Trimming: Trim long vines to keep them full. You can also train them up a moss pole or let them trail from a shelf or hanging pot.
  • Propagation: Both root easily from stem cuttings. Cut just below a node, remove the lowest leaf and place the cutting in water or moist soil. Roots usually form within a few weeks.

Pothos vs Philodendron in Low Light

Both are popular for dim rooms, which is why they appear on our list of Best Low Light Indoor Plants. in low light they grow more slowly and need less water. Variegated types, such as marbled pothos, may lose some of their pattern and look greener, and vines can become long and bare between the leaves. A brighter spot fixes this.

Are Pothos and Philodendron Toxic to Pets?

Yes, both are. They contain insoluble calcium oxalate crystals, which can cause burning and irritation of the mouth, tongue and lips, drooling, vomiting and difficulty swallowing if chewed or eaten. The ASPCA lists pothos as toxic to cats and dogs.

So when it comes to pothos vs philodendron, neither is the pet-safe choice. If you have pets, keep these plants in hanging baskets or on high shelves, out of reach. If your pet eats some, contact your vet or an animal poison control service. If you want pet-safe options for a dim room, see our Best Low Light Indoor Plants guide, which marks which plants are non-toxic.
Pothos:

  • Golden pothos: Green leaves with yellow streaks. The classic.
  • Marble Queen: Creamy white and green marbling.
  • Neon: Bright lime-yellow leaves.
  • Jade: Solid, deep green leaves.

Heartleaf philodendron:

  • Green heartleaf: Solid green heart-shaped leaves.
  • Brasil: Green leaves with yellow-green stripes.
  • Lemon Lime: Bright, chartreuse leaves.
  • Micans: Velvety leaves with a bronze-purple sheen.

Neon pothos and Lemon Lime philodendron look very alike. This is when the cataphyll test (test 3) is most useful.

Which One Should You Choose?

In the pothos vs philodendron choice, there is no wrong answer. Both are easy, fast-growing and forgiving. Use this guide:

If you want…Consider…
Bold patterns such as white marbling or yellow streaksPothos
A soft, classic heart shape and a matte lookHeartleaf philodendron
An easy plant for a beginnerEither one
A trailing plant for a shelf or hanging potEither one
A pet-safe plantNeither. Both are toxic

Frequently Asked Questions

Is a heartleaf philodendron the same as a pothos?

No. They look alike, but they are different plants from different genera. Use the five tests above to tell them apart.

Can pothos and philodendron share a pot?

Their needs are similar, so it can work. But the vines tangle together, they compete for space, and it becomes hard to tell which is which later. Separate pots are easier.

Which one grows faster?

Both grow quickly in good light. How fast they grow depends more on the variety, light and care than on which genus the plant belongs to.

Can I grow either one in water?

You can root stem cuttings of both in water. For long-term growth, move them into soil once they have healthy roots.

What is a satin pothos?

It is actually Scindapsus pictus, a different plant with silvery-spotted leaves, not a true pothos.

Final Thoughts

Pothos vs philodendron comes down to a few small clues: leaf texture, leaf shape, a cataphyll on new growth, the aerial roots and the leaf stem. Check two or three of them and you will know what you have. After that, the good news is that both plants want the same simple care: bright, indirect light, a soil check before each watering, and a safe spot away from curious pets.

Related reading: Best Low Light Indoor Plants and How Often to Water a Snake Plant
Finding the best low light indoor plants can feel confusing when every list seems to say the same thing. Some plants only tolerate dim rooms, while others actually look good in them. And if you share your home with a cat or a dog, there is a second question: is this plant safe? This guide gives you 10 easy, reliable plants for low light, with honest notes about how much light each one needs, how to water it and whether it is toxic to pets.

The Best Low Light Indoor Plants at a Glance
PlantLight toleranceWateringSafe for cats and dogs?
Snake plantLow to brightLet soil dry fullyNo (toxic)
ZZ plantLow to mediumLet soil dry fullyNo (toxic)
PothosLow to brightWhen top 1 to 2 inches are dryNo (toxic)
Cast iron plantVery low to mediumWhen top inch or so is dryYes (non-toxic)
Parlor palmLow to mediumKeep lightly moistYes (non-toxic)
Peace lilyLow to mediumKeep evenly moistNo (toxic)
Chinese evergreenLow to mediumWhen top inch is dryNo (toxic)
Spider plantLow to brightKeep lightly moistYes (non-toxic)
Heartleaf philodendronLow to brightWhen top inch is dryNo (toxic)
Corn plant (Dracaena)Low to mediumWhen top half is dryNo (toxic)

Pet information is based on ASPCA listings. “Non-toxic” does not mean a pet can eat as much as it likes, because chewing plants can still upset a stomach.

What Does Low Light Actually Mean?

Low light does not mean no light. It usually means a spot with no direct sun, such as a room with a north-facing window (in the Northern Hemisphere), or a spot a few feet away from a bright window. Plants can survive there, but they grow more slowly.

Here is a quick way to check your own room:

  • The shadow test. Hold your hand about a foot above the spot around midday. A sharp, dark shadow means bright light. A soft, blurry shadow means medium to low light. Hardly any shadow means very low light.
  • The reading rule. If you can read comfortably during the day without switching on a lamp, the spot is probably fine for most low light plants.

A tip for readers worldwide: window direction works in reverse in the Southern Hemisphere. There, north-facing windows get the most sun and south-facing ones get the least.

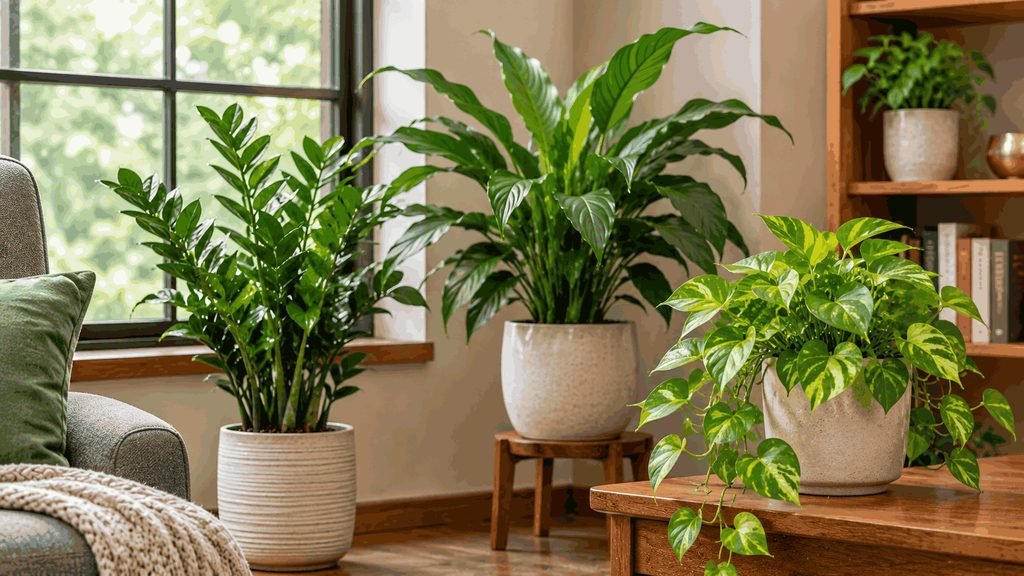
Indoor plants growing in a room with soft indirect natural light near a window.

10 Easy Low Light Plants to Try

Here are our picks for the best low light indoor plants, in no particular order. Every plant below can handle a dim room, but all of them grow better with some bright, indirect light.

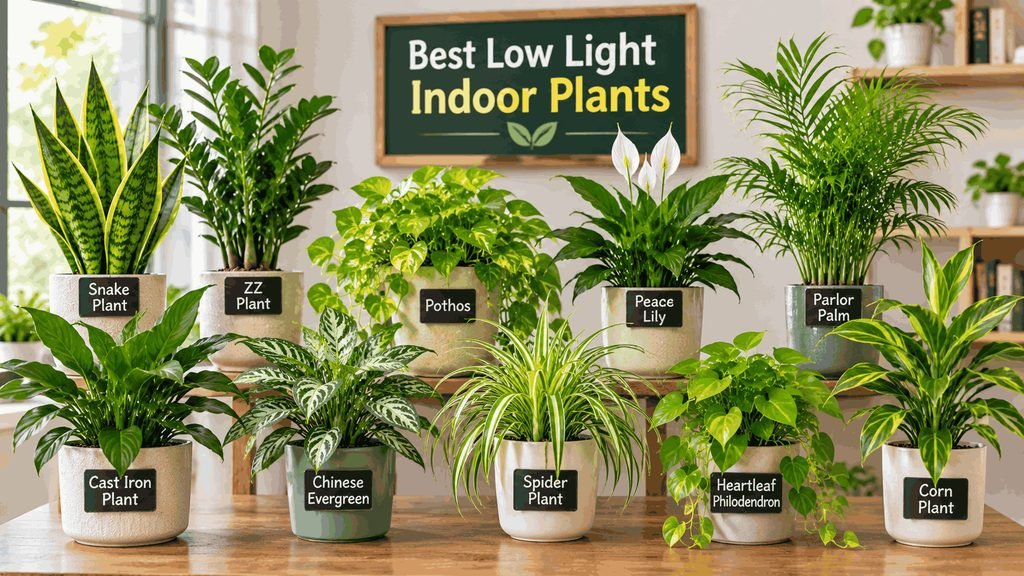
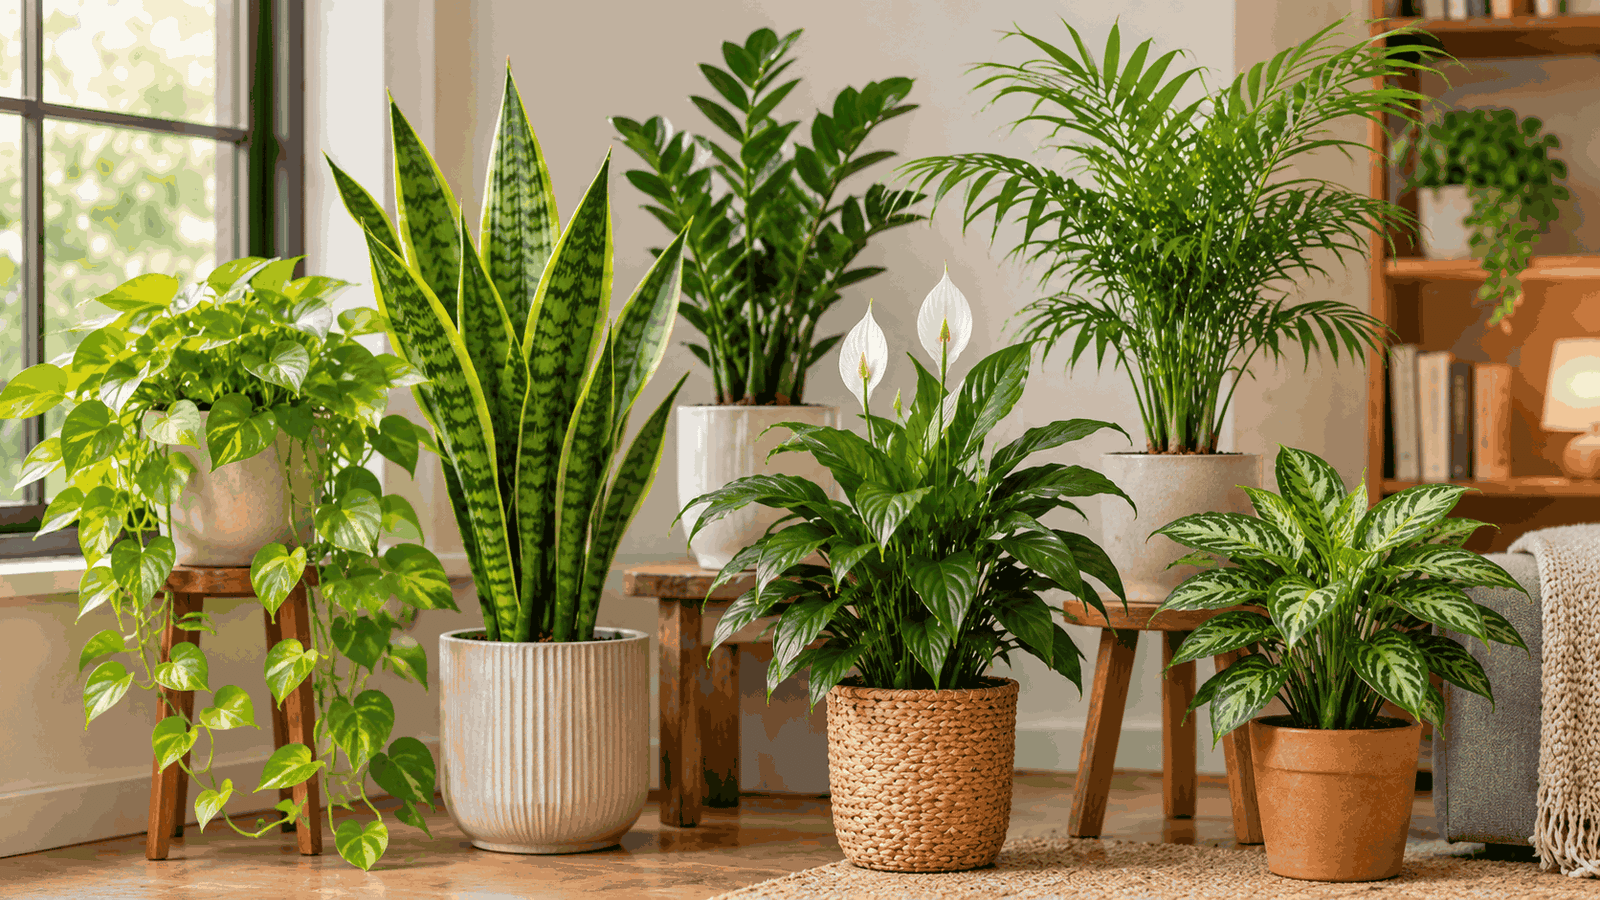
Different low-light indoor plants including snake plant, ZZ plant, pothos, peace lily, and parlor palm arranged in pots.

1. Snake Plant

  • Light: Low to bright
  • Water: Only when the soil is completely dry, usually every 2 to 3 weeks
  • Pets: Toxic to cats and dogs (ASPCA)

The upright leaves fit narrow corners and the plant tolerates neglect. Its biggest enemy is too much water, especially in dim rooms where soil dries slowly. See our Snake Plant Care guide and How Often to Water a Snake Plant.

2. ZZ Plant

  • Light: Low to medium, indirect
  • Water: Let the soil dry out between waterings, often every 2 to 4 weeks
  • Pets: Toxic to cats and dogs (ASPCA)

Glossy, dark leaves and thick underground stems that store water make the ZZ plant very forgiving. Growth is slow in low light. Wash your hands after handling it, because the sap can irritate skin.

3. Pothos

  • Light: Low to bright
  • Water: When the top 1 to 2 inches (2.5 to 5 cm) of soil are dry
  • Pets: Toxic to cats and dogs (ASPCA)

A fast, trailing vine that looks great on shelves or in hanging pots. In dim light, variegated types lose some of their pattern and look greener.

4. Cast Iron Plant

  • Light: Very low to medium
  • Water: When the top inch or so is dry. Do not overwater
  • Pets: Non-toxic (ASPCA)

As its name suggests, it is almost indestructible and handles deep shade and cooler rooms. It grows slowly, so buy a fuller plant if you want an instant effect. Keep it out of direct sun, which can scorch the leaves.

5. Parlor Palm

  • Light: Low to medium
  • Water: Keep the soil lightly moist, but not soggy
  • Pets: Non-toxic (ASPCA)

A soft, feathery palm that suits living rooms and bedrooms and usually stays about 2 to 4 feet (60 to 120 cm) tall indoors. Very dry air can cause brown tips and attract spider mites.

6. Peace Lily

  • Light: Low to medium
  • Water: Keep evenly moist. It droops dramatically when thirsty, which makes it easy to read
  • Pets: Toxic to cats and dogs (ASPCA)

Peace lilies tolerate low light, but they flower less there. Despite the name, it is not a true lily, but the ASPCA still lists it as toxic to pets.

7. Chinese Evergreen

  • Light: Low to medium
  • Water: When the top inch of soil is dry
  • Pets: Toxic to cats and dogs (ASPCA)

It offers pretty patterned leaves. Plain dark green varieties handle lower light best, while silver or pink types prefer a bit more brightness. It dislikes cold drafts.

8. Spider Plant

  • Light: Low to bright (grows best in bright, indirect light)
  • Water: Keep the soil lightly moist
  • Pets: Non-toxic (ASPCA)

A cheerful, arching plant that sends out baby plantlets, perfect for hanging pots. In low light it grows slower and makes fewer babies. Brown tips are common and are usually caused by dry soil or minerals in the water.

9. Heartleaf Philodendron

  • Light: Low to bright
  • Water: When the top inch of soil is dry
  • Pets: Toxic to cats and dogs (ASPCA)

Similar to pothos, with heart-shaped leaves and trailing stems. It is a good choice for a high shelf, out of reach of pets.

10. Corn Plant (Dracaena)

  • Light: Low to medium
  • Water: When the top half of the soil is dry
  • Pets: Toxic to cats and dogs (ASPCA)

If you want a tall plant for a floor corner, this is a classic. It can reach several feet indoors. Avoid soggy soil, and keep it away from cold drafts.

How to Choose the Best Low Light Indoor Plants for Your Room
Start with your light, then choose by room and by pets.

If you need…Try…
A bedroom plantSnake plant, ZZ plant, parlor palm, pothos
An office desk plantZZ plant, snake plant, Chinese evergreen, cast iron plant
A bathroom with a windowPothos, peace lily, spider plant (most plants will not survive a bathroom with no window at all)
A tall floor plantCorn plant, parlor palm, tall snake plant
A shelf or hanging plantPothos, heartleaf philodendron, spider plant
A pet-safe choiceCast iron plant, parlor palm, spider plant

Also think about how much time you have. If you forget to water, pick a snake plant or ZZ plant. If you like a plant that tells you when it is thirsty, the peace lily is a good fit.

Pet Safety: Which Low Light Plants Are Safe for Cats and Dogs?

Many popular low light plants are toxic to pets. In the list above, the snake plant, ZZ plant, pothos, peace lily, Chinese evergreen, heartleaf philodendron and corn plant are listed by the ASPCA as toxic to cats and dogs. Chewing them can cause drooling, vomiting or stomach upset, and some cause mouth irritation.

Best Low Light Indoor Plants for Homes With Pets
If you have curious pets, the best low light indoor plants are the non-toxic ones. From this list, those are the cast iron plant, parlor palm and spider plant. Even non-toxic plants can cause stomach upset if a pet eats a lot, so keep an eye on them.

If you already own a toxic plant, keep it on a high shelf or in a room your pet cannot enter. If you think your pet has eaten part of a plant, contact your vet or an animal poison control service right away. Always check each plant’s status on the ASPCA website, because lists can change.

How to Care for Plants in Low Light
Even the best low light indoor plants need a little extra care to do well in dim spots.

  • Water less. Plants in low light use water slowly. Always check that the soil is dry before watering. Overwatering is the number one killer in dim rooms.
  • Use a pot with drainage holes and a well-draining mix.
  • Rotate the pot every few weeks so all sides get light.
  • Wipe the leaves. Dust blocks light, so wipe leaves with a damp cloth now and then.
  • Feed lightly. Plants in low light barely grow, so they need little fertilizer.
  • Add a grow light if needed. If a spot is very dark, a basic LED grow bulb in a normal lamp, on a timer for several hours a day, can make a big difference.
  • Give them a break. Every so often, swap the plant into a brighter spot for a while.
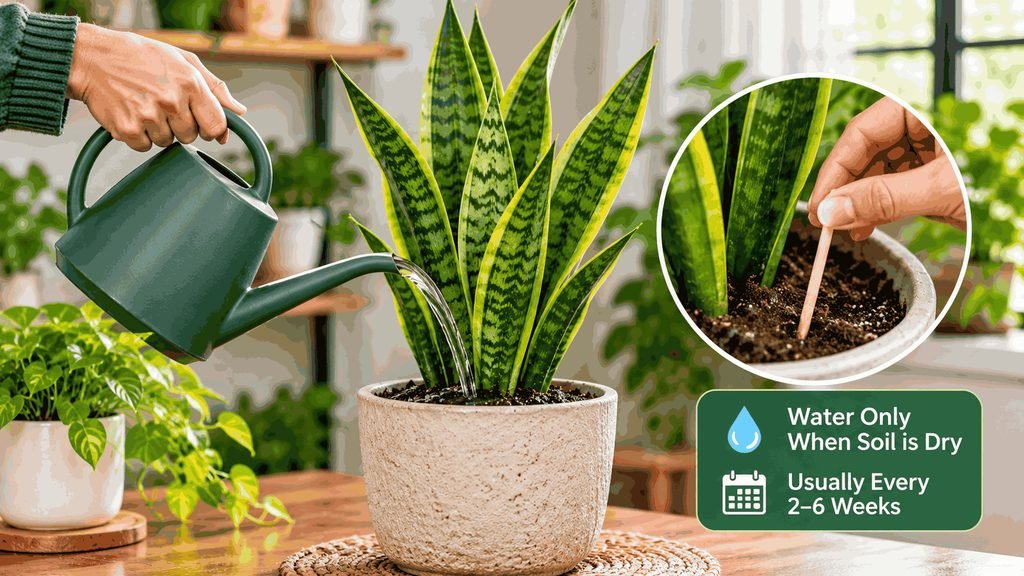
Watering an indoor snake plant and checking soil moisture as part of low-light plant care.

Do Low Light Plants Clean the Air?

You will often see low light plants advertised as air purifiers. That claim comes mostly from a 1989 NASA study that tested plants in small, sealed chambers. Later research suggests that in a normal home, ventilation matters far more than a few houseplants. None of the best low light indoor plants should be treated as an air purifier. Choose them because they look good, they are easy to look after and they make a room feel alive.

Frequently Asked Questions

Can indoor plants grow with no natural light?

Not for long. Plants need light to live. In a room with no window, you need a grow light. Otherwise, swap the plant into a brighter place regularly.

What is the easiest low light plant?

The snake plant, ZZ plant and cast iron plant are three of the most forgiving. Choose the cast iron plant if you have pets.

What are the best plants for a bathroom?

A bathroom with a window can suit pothos, peace lily or spider plant. A bathroom with no window is hard for any plant, so use a grow light or rotate plants in and out.

Do low light plants need less water?

Yes, usually. Slow growth means less water use, and soil stays wet longer in dim rooms. Test the soil before every watering.

Which low light plants are safe for cats and dogs?

From our list, the cast iron plant, parlor palm and spider plant are listed as non-toxic by the ASPCA. Always double-check on the ASPCA site before you buy.

Final Thoughts

The best low light indoor plants are the ones that fit your light, your routine and your pets. Start with one or two easy plants, such as a snake plant or cast iron plant, check the soil before every watering, and give them a brighter break now and then. A dim corner can look green and lively with the right plant.

Snake plant care is simple once you know what this tough plant actually wants. It handles dim corners, missed waterings and busy schedules better than almost any other houseplant, yet it still struggles when it is overwatered or planted in the wrong pot. This guide covers everything in one place: light, water, soil, temperature, repotting, propagation, pets and the most common problems. Whether you have just bought your first plant or you are trying to rescue one, you will find clear, practical steps below.

Snake Plant Care at a Glance

Here is the short version. The sections below explain each point.

WhatWhat your snake plant needs
LightBright, indirect light is ideal. It tolerates low light and some direct sun
WaterOnly when the soil is completely dry. Roughly every 2 to 3 weeks in the growing season, much less in winter
SoilFast-draining cactus or succulent mix
PotA pot with a drainage hole. Terracotta helps the soil dry faster
TemperatureIdeally about 65 to 85°F (18 to 29°C). Avoid anything below 50°F (10°C)
HumidityNormal household humidity is fine. No misting needed
FeedingLight feeding in spring and summer, none in fall and winter
RepottingEvery 2 to 5 years, or when the plant is crowded
PropagationDivision (keeps variegation) or leaf cuttings
PetsToxic to cats and dogs

The snake plant (Dracaena trifasciata, formerly Sansevieria trifasciata) comes in many shapes and colors. The care is very similar for all of them, though some details differ. A few popular types:

  • ‘Laurentii’: The classic, with dark green leaves and yellow edges.
  • ‘Moonshine’: Pale, silvery-green leaves.
  • ‘Hahnii’ (bird’s nest): A compact, low rosette of short leaves.
  • Cylindrica types: Round, spear-like leaves, sometimes braided. These are close relatives with the same easy-going care.

Variegated types such as ‘Laurentii’ need a little more light to keep their patterns.

Snake Plant Light Requirements

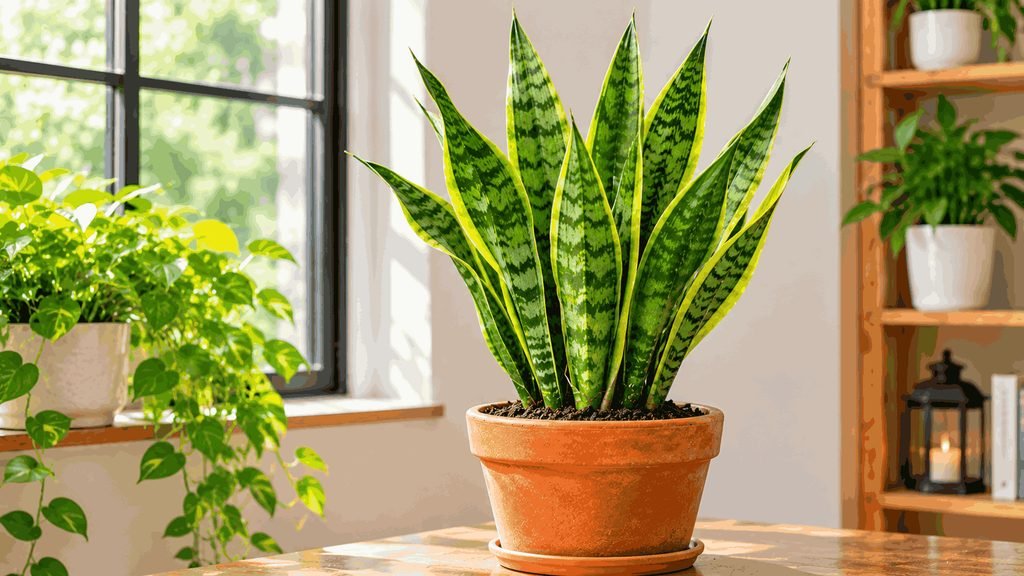
Healthy snake plant growing near a window with bright indirect sunlight.

Good snake plant care starts with light. Bright, indirect light, such as a spot near an east- or north-facing window, gives the best growth and the richest colors. A few hours of gentle direct sun is usually fine, but hot afternoon sun through glass can scorch the leaves.

Snake plants also survive in low light, but growth slows down and variegated types lose some of their contrast. Signs that your plant needs more light:

  • New leaves are thinner and paler than older ones.
  • The plant leans toward the window.
  • Variegated leaves lose their yellow or silver edges.

A snake plant cannot live in total darkness, so a windowless bathroom is not a good long-term home unless you add a grow light. Turn the pot a quarter turn every few weeks so it grows evenly, and wipe dust off the leaves with a damp cloth so they can take in light.

How to Water a Snake Plant

Watering is where most people go wrong. The golden rule: water only when the soil has dried out completely, then water thoroughly and let the excess drain. In the growing season this is usually every 2 to 3 weeks, and in winter it can be every 4 to 6 weeks or even less.

For the full routine, including a soil test, seasonal schedule and signs of over- and underwatering, read our guide on How Often to Water a Snake Plant.

Best Soil and Pot for a Snake Plant

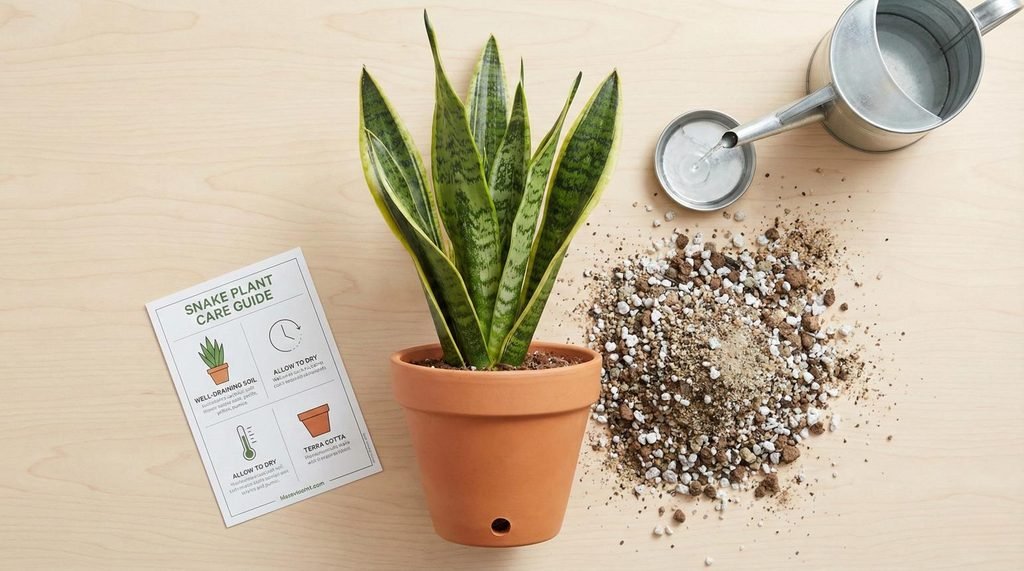
Snake plant in a terracotta pot with well-draining soil, perlite and a drainage hole.

Snake plants hate wet feet, so drainage matters more than anything else here.

  • Soil: Use a cactus or succulent mix, or mix regular potting soil with perlite or coarse sand so water drains quickly. Dense, peaty soil stays wet too long.
  • Pot: Always choose a pot with a drainage hole. Terracotta is a good choice because it lets the soil dry faster, and its weight keeps tall plants from tipping over.
  • Size: Pick a pot only slightly bigger than the root ball, about 1 to 2 inches (2.5 to 5 cm) wider. Snake plants like to be snug, and a very large pot holds extra wet soil.

Temperature, Humidity and Feeding

Temperature. Snake plants are happiest in normal room temperatures, about 65 to 85°F (18 to 29°C). They can handle brief dips, but anything below about 50°F (10°C) can damage the leaves. Keep them away from cold windows in winter, and from air-conditioning vents and drafts.

Humidity. Average household humidity is fine. Skip the misting, because it does not help and wet leaves can encourage problems.

Feeding. Snake plants need very little fertilizer. Feed lightly once or twice in spring and summer using a balanced houseplant or cactus fertilizer, following the diluted strength on the label. Do not feed in fall and winter, or if the plant is in low light. Too much fertilizer builds up salts in the soil and can burn the roots.

Repotting a Snake Plant: When and How

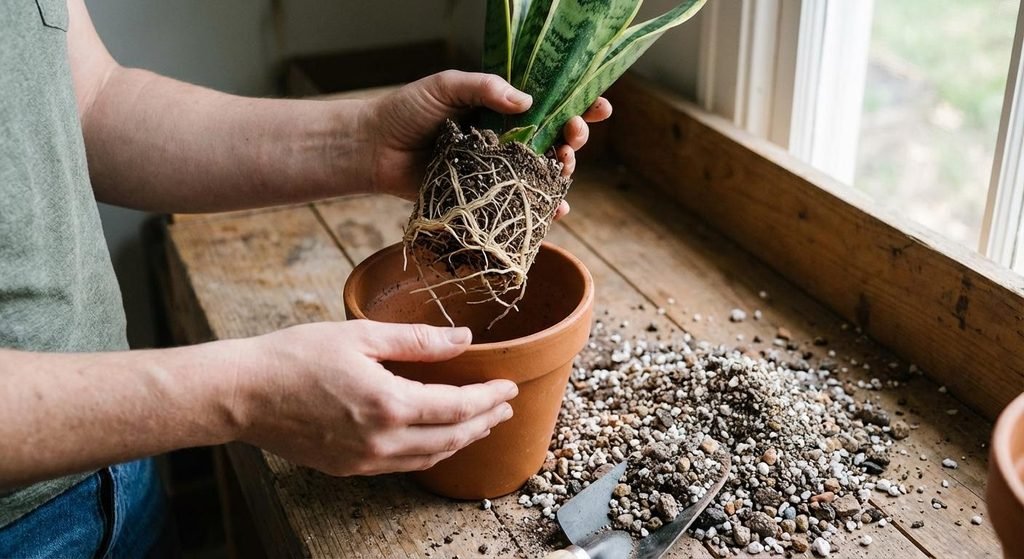
- Snake plant being transferred into a slightly larger terracotta pot with fresh well-draining soil.

Repotting is the one big job in snake plant care. These plants grow slowly and like to be slightly crowded, so you only need to repot every 2 to 5 years. Signs it is time:

  • Roots are growing out of the drainage holes.
  • The pot is bulging or cracking.
  • The plant keeps tipping over.
  • Water runs straight through without soaking in.

How to repot (best in spring or early summer):

  1. Water lightly a day or two before so the plant is not brittle.
  2. Slide the plant out of its pot, gently loosening the roots.
  3. Check the roots and trim any that are soft, brown or smelly.
  4. Place the plant in a slightly larger pot with fresh, fast-draining mix, at the same depth as before.
  5. Wait several days to a week before watering, so any damaged roots can heal.

If you see small plants (pups) growing from the base, you can separate them at this stage. See the next section.

How to Propagate a Snake Plant

There are two easy ways to make more snake plants. Spring and summer are the best times.

Method 1: Division (best for variegated types)

  1. Take the plant out of its pot.
  2. Look for pups, which are young shoots joined by thick underground stems (rhizomes).
  3. Cut or gently pull them apart, making sure each piece has roots and at least one leaf.
  4. Plant each division in its own pot with fresh, fast-draining mix, and water lightly.

Method 2: Leaf Cuttings

  1. Cut a healthy leaf at the base with clean scissors.
  2. Cut it into sections about 3 to 4 inches (8 to 10 cm) long, and remember which end was the bottom. Sections planted upside down will not root.
  3. Let the cut ends dry for a day or two.
  4. Place the bottom end in water or lightly damp soil, in bright indirect light.
  5. Be patient. Roots can take several weeks, and new plantlets take longer.

Important: Leaf cuttings from variegated types such as ‘Laurentii’ usually grow back as plain green plants, because the yellow edges are not reliably passed on. To keep the pattern, propagate by division.

Snake Plant Care Indoors vs Outdoors

Most people grow snake plants indoors, where they are very easy. In warm climates you can also grow them outside. As a rough guide, they can live outdoors year-round in USDA zones 9 to 11, in partial shade to bright light. In the ground they can spread aggressively in some regions, so check local guidance before planting them in a garden bed, or keep them in pots.

Snake plant care changes with the seasons and with your climate:

  • Winter: Growth slows, so water far less and stop feeding. Remember that winter means roughly December to February in the Northern Hemisphere and June to August in the Southern Hemisphere.
  • Cold regions: Bring potted plants indoors before temperatures drop toward 50°F (10°C).
  • Hot climates: In warm areas, such as much of South Asia, the Middle East or Southeast Asia, soil can dry faster in hot months, so check it more often. Protect leaves from harsh midday sun.

Common Snake Plant Problems and Fixes

ProblemLikely causeWhat to do
Yellow leavesOverwatering, poor drainage, cold, too much sun or natural agingCheck the soil and roots. See Snake Plant Leaves Turning Yellow
Soft, mushy base or leavesOverwatering and root rotStop watering and check the roots. See How Often to Water a Snake Plant
Brown tipsSoil staying too dry for too long, fertilizer salts, or physical damageWater thoroughly, flush the soil and feed less
Leaves falling over or droopingToo much water, too little light, cold, or a pot that is too bigCheck soil moisture, light and temperature
Wrinkled, curling leavesUnderwateringWater deeply, then follow the soil test
Very slow growthLow light, winter, or just a naturally slow growerGive more light in the growing season
Sticky residue, webbing or white fluffPests such as mealybugs or spider mitesIsolate the plant and wipe the leaves

Snake Plant Care Mistakes That Cause Most Problems

Most problems come back to a few habits:

  • Watering on a fixed schedule instead of checking the soil.
  • Using a pot with no drainage hole.
  • Choosing a pot that is far too large.
  • Leaving the plant in a dark corner and then overwatering it.
  • Keeping it near cold windows or drafts in winter.

Are Snake Plants Safe for Pets?

No. The ASPCA lists the snake plant as toxic to cats and dogs. It contains saponins, which can cause nausea, vomiting and diarrhea if chewed or eaten. Part of responsible snake plant care is keeping it out of reach of curious pets. If your pet eats some, contact your vet or an animal poison control service.

Do Snake Plants Really Clean the Air?

You may have read that snake plants purify indoor air. That idea comes largely from a 1989 NASA study that tested plants in small, sealed chambers. Later research suggests that in a normal home, ordinary ventilation does far more for air quality than a few houseplants. So grow your snake plant for its looks and easy nature, not as an air purifier.

Frequently Asked Questions

How fast does a snake plant grow?

Slowly. Most growth happens in spring and summer, and plants in low light grow even more slowly. Do not be worried if it seems to do nothing for months.

Can a snake plant live in a bathroom or a dark room?

It can survive low light, but not total darkness. If there is no window, use a grow light, or move the plant to a brighter spot.

Do snake plants flower?

Rarely indoors. When they do, they produce small, pale, fragrant flowers on a tall stalk. Do not worry if yours never flowers.

Should I mist my snake plant?

No. It does not need extra humidity.

Should I cut off damaged leaves?

Yes, if a leaf is mostly yellow, brown or mushy. Cut it off at the base with clean, sharp scissors.

Final Thoughts

Snake plant care really comes down to a few habits: give it bright, indirect light, plant it in fast-draining soil in a pot with drainage, water only when the soil is completely dry, and leave it alone the rest of the time. Get those right and this plant will reward you with years of steady, easy growth.

Start with the basics, learn your plant’s rhythm, and use the problem table above whenever something looks off.

Finding snake plant leaves turning yellow can be a shock, especially when this is the plant everyone calls almost impossible to kill. Do not panic. Yellow leaves are your plant’s way of saying that something in its setup is off, and most of the time you can fix it. The trick is working out which cause fits your plant, because the cure for too much water is the opposite of the cure for too little. This guide helps you diagnose the problem in a few minutes and tells you exactly what to do next.

Snake Plant Leaves Turning Yellow: The Quick Diagnosis

By far the most common cause is overwatering. But other problems can look similar, so match what you see to the table below.

What you seeMost likely causeFirst thing to try
Soft, mushy yellow leaves, wet soil, bad smellOverwatering or root rotStop watering and check the roots
Pale, dry, wrinkled yellow leavesUnderwateringWater deeply, then follow the soil test
Yellow or bleached patches on the sunniest sideToo much direct sunMove to bright, indirect light
Slowly fading, floppy leaves and a leaning plantToo little lightMove closer to a window
Sudden yellowing after a cold night or draftCold damageMove away from cold glass and vents
One or two of the oldest outer leaves yellowing slowlyNatural agingNothing to fix
Yellowing with sticky residue, webbing or white fluffPestsIsolate the plant and wipe the leaves
Yellowing with white crust on the soil, or very old soilFertilizer build-up or tired soilFlush and refresh the soil

If you are not sure, check the soil and the base of the plant first. Wet soil and a soft base point straight to overwatering.

First, Check Whether the Yellowing Is Normal

Not every case of snake plant leaves turning yellow is a problem. Two situations are completely normal:

  • Natural aging. The oldest, outermost leaves slowly turn yellow, shrivel and fade as the plant replaces them with new growth. If the rest of the plant looks healthy and new leaves are coming, there is nothing to fix.
  • Variegated varieties. Some types, such as ‘Laurentii’, naturally have yellow or gold edges. If the yellow border was there when you bought the plant and new leaves show the same pattern, that is simply how the plant looks.

If neither applies, keep reading.

8 Common Reasons for Snake Plant Leaves Turning Yellow

Plenty of things can lead to snake plant leaves turning yellow, so work through these in order. Start with number one, because it is the most likely.

1. Overwatering: The Top Reason for Snake Plant Leaves Turning Yellow

Snake plants store water in their thick leaves and underground stems, so they cope with dry spells far better than with wet soil. When the soil stays soggy, the roots cannot get oxygen and begin to rot. The leaves turn yellow, feel soft or mushy, and may fall over. The base of the plant may be dark and smell bad.

What to do: Stop watering. Take the plant out of its pot, shake off the wet soil and look at the roots. Healthy roots are firm and light in color. Rotten roots are brown or black, soft and smelly. Trim the rotten parts with clean scissors, repot in fresh, fast-draining soil in a pot with drainage holes, and wait a week or more before watering again. For the full routine, see our guide on How Often to Water a Snake Plant.

The New York Botanical Garden also has useful advice on how to water a snake plant.

Snake plant being removed from its pot for root inspection.

2. Poor Drainage or Heavy Soil

Even with careful watering, a pot with no drainage hole or a dense, peaty soil keeps the roots wet for too long. Water left in the saucer or a decorative outer pot causes the same problem.

What to do: Use a pot with drainage holes, empty the saucer after watering, and switch to a cactus or succulent mix, or lighten regular potting soil with perlite or coarse sand.

3. Underwatering

This is much less common, but it happens. Leaves turn pale yellow or straw-colored, feel dry or brittle, and may wrinkle or curl. The soil is bone dry and may pull away from the edge of the pot.

What to do: Water thoroughly until water drains from the bottom, or set the pot in a few inches of water for 10 to 20 minutes and let it drain. Then go back to checking the soil before each watering instead of watering on a fixed date.

4. Too Much Direct Sun

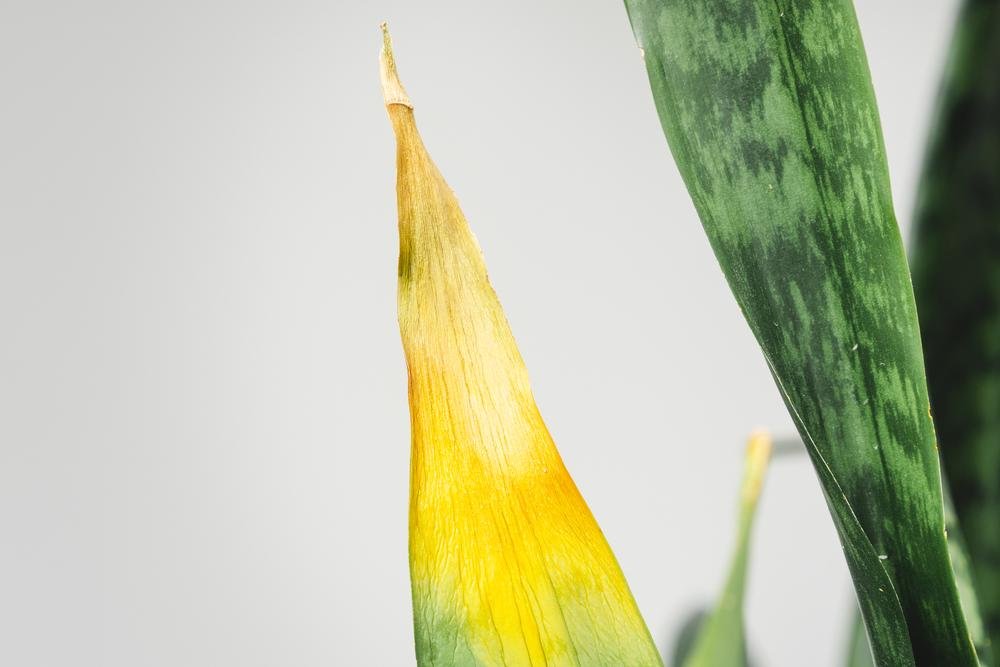
Snake plants handle a lot of light, but harsh afternoon sun through glass can scorch the leaves. You will see yellow or bleached patches, often on the side facing the window, which may later turn brown and crispy.

What to do: Move the plant back from the window or filter the light with a sheer curtain. Bright, indirect light is ideal. If you want to move it into more sun, do it gradually.

5. Too Little Light

Snake plants tolerate low light, but not darkness. In a very dim spot, growth slows, leaves lose their rich color and the plant may lean toward the light. Low light also keeps the soil wet longer, which makes overwatering more likely.

What to do: Move the plant to a brighter spot and water less often until it adjusts.

6. Cold Temperatures and Drafts

Snake plants are tropical in origin and dislike the cold. Temperatures below about 50°F (10°C), cold windows in winter and drafts from doors or air-conditioning vents can cause yellow, soft or water-soaked leaves.

What to do: Keep the plant away from cold glass and vents, and give it a warmer spot. Remember that winter falls in different months depending on where you live, roughly December to February in the Northern Hemisphere and June to August in the Southern Hemisphere. In very hot climates the problem is often the opposite: strong sun and air conditioning, so check both.

7. Too Much Fertilizer or Tired Soil

Snake plants need very little feeding. Too much fertilizer builds up salts in the soil and can burn the roots, leading to yellowing. You may see a white crust on the soil surface. On the other hand, soil that has not been refreshed for years can become compacted and poor.

What to do: Flush the soil with plenty of water so it drains freely, and stop feeding for a while. If the soil is old and compacted, repot into fresh mix. When you do feed, follow the label and use less rather than more.

8. Pests and Leaf Diseases

Mealybugs (white, cottony clusters), spider mites (fine webbing and speckled leaves) and scale (small brown bumps) can all cause yellowing. Fungal leaf spots can appear as yellowish-brown marks, especially when leaves stay wet.

What to do: Isolate the plant. Wipe the leaves with a damp cloth, and dab small clusters of mealybugs or scale with a cotton swab dipped in rubbing alcohol. Check the underside of leaves and the base. Avoid wetting the leaves, and if an infestation is severe, follow the instructions on a product made for houseplants.

How to Fix Yellow Snake Plant Leaves, Step by Step

Work through these steps in order, and change only one thing at a time so you know what helped.

  1. Look at which leaves are yellow. The oldest outer leaves point to natural aging. Many leaves at once, or new leaves, point to a care problem.
  2. Check the soil. Wet means overwatering or poor drainage. Bone dry means underwatering.
  3. Check the base and roots if leaves are soft or the soil smells. Trim rotten roots and repot if needed.
  4. Check light and temperature. Look for harsh direct sun, a very dark spot, cold windows or drafts.
  5. Inspect the leaves and soil for pests, sticky residue or a salt crust.
  6. Fix the cause, then wait. Recovery is slow. New, healthy growth over the next few weeks is the real sign that the fix worked.

Should You Cut Off Yellow Leaves? Can They Turn Green Again?

Once a leaf has turned mostly yellow, it rarely goes back to green. Mild yellowing caused by too much sun may improve if you fix the light early, but a fully yellow leaf is usually finished.

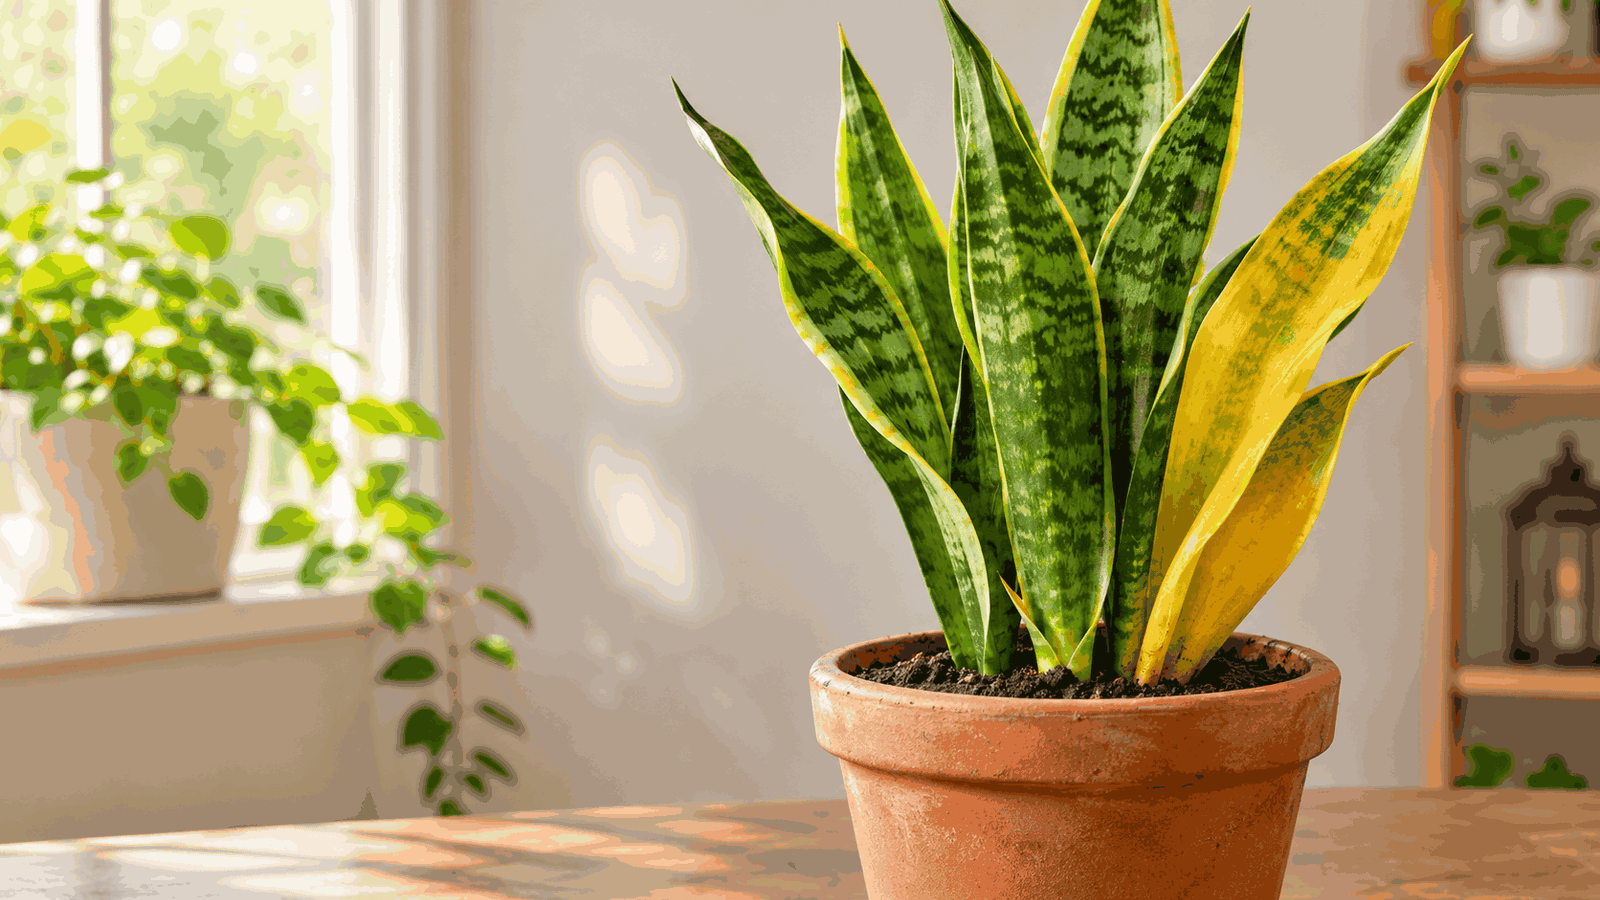
Close-up of a snake plant leaf with yellow discoloration among green leaves.
  • Remove leaves that are mostly yellow, brown or mushy. Cut them off at the base with clean, sharp scissors or a knife.
  • Leave leaves that are only slightly yellow, as long as they are still firm. They still help the plant.
  • Do not cut healthy leaves just because one is yellow.

Removing damaged leaves does not cure the problem. Fix the cause, or the next leaf will follow.

How to Prevent Yellow Leaves in the Future

The best way to avoid snake plant leaves turning yellow is to get watering and drainage right. These habits help:

  • Check the soil and water only when it is completely dry.
  • Use a pot with drainage holes and a fast-draining soil mix.
  • Give bright, indirect light, and avoid scorching afternoon sun through glass.
  • Keep the plant away from cold drafts, and water much less in winter.
  • Feed lightly, if at all.
  • Check leaves and soil for pests once a month.
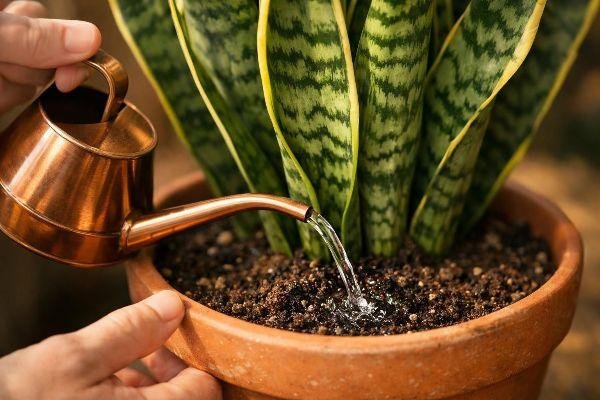
Water being poured onto the soil of an indoor snake plant.

Frequently Asked Questions

Why is my snake plant turning yellow and soft?

Soft, yellow leaves usually mean overwatering and root rot, though cold damage can look similar. Check the soil moisture and the base of the plant.

Why is only one leaf yellow?

If it is one of the oldest outer leaves, it is probably natural aging. If it is a newer leaf, check the roots, soil moisture and light.

Why did my snake plant turn yellow after repotting?

Repotting can stress the plant and damage roots. A pot that is too big, or fresh soil that stays wet, can also lead to rot. Let the soil dry out before watering again.

Can a snake plant with mostly yellow leaves be saved?

Often, yes, if the roots or the underground stem are still firm. Remove the damaged leaves, fix the cause and be patient. If the base is mostly rotten, you may be able to grow new plants from healthy leaf cuttings.

Is yellowing normal in winter?

Not really. A cold, wet pot in winter is a common cause. Water less, keep the plant warm and make sure it gets as much light as possible.

Final Thoughts

Snake plant leaves turning yellow is a sign to slow down and look at your care routine, not a reason to give up. Start with the soil, then check light, temperature and pests. In most cases, adjusting your watering and drainage is enough to turn things around.

Fix one thing at a time, give your plant a few weeks, and watch for new growth. That is how you know it is recovering.

Related reading: How Often to Water a Snake Plant and Snake Plant Care Guide

If you have ever stood over your snake plant with a watering can, wondering whether it is thirsty or you are about to drown it, you are not alone. Working out how often to water a snake plant is the question new plant owners ask most, and it is also where most people go wrong. The good news is that this plant forgives a lot, and the rule is simple once you know it. In this guide you will get a realistic schedule for every season, an easy soil test, and the warning signs to watch for.

The Short Answer: How Often to Water a Snake Plant

Most snake plants need water about every 2 to 3 weeks in spring and summer, and only every 4 to 6 weeks (sometimes even less) in winter. But the calendar is just a starting point. The real rule is this: water only when the soil has dried out completely.

Here is a quick guide to the usual ranges:

Your situationTypical watering frequency
Bright indirect light, warm seasonEvery 2 to 3 weeks
Low lightEvery 3 to 5 weeks
Cool room or winterEvery 4 to 6 weeks, sometimes less
Hot, dry climate or very sunny spotEvery 1 to 2 weeks
Small or terracotta potToward the shorter end
Large or plastic potToward the longer end

These are rough ranges, not rules. Even experienced growers quote anything from every two weeks to every eight weeks, which shows how much your own home conditions matter.

Why Snake Plants Need Less Water Than Most Houseplants

The snake plant (Dracaena trifasciata, formerly called Sansevieria trifasciata) is native to West Africa. Its thick, upright leaves and underground stems (called rhizomes) store water, so it copes with dry spells far better than leafy tropical plants. A missed watering rarely hurts it. A pot that stays soggy can.

That is the key idea behind everything below: with a snake plant, too much water is a much bigger risk than too little.

The Soil Test: The Best Way to Know When to Water

Instead of watering on a fixed date, check the soil.

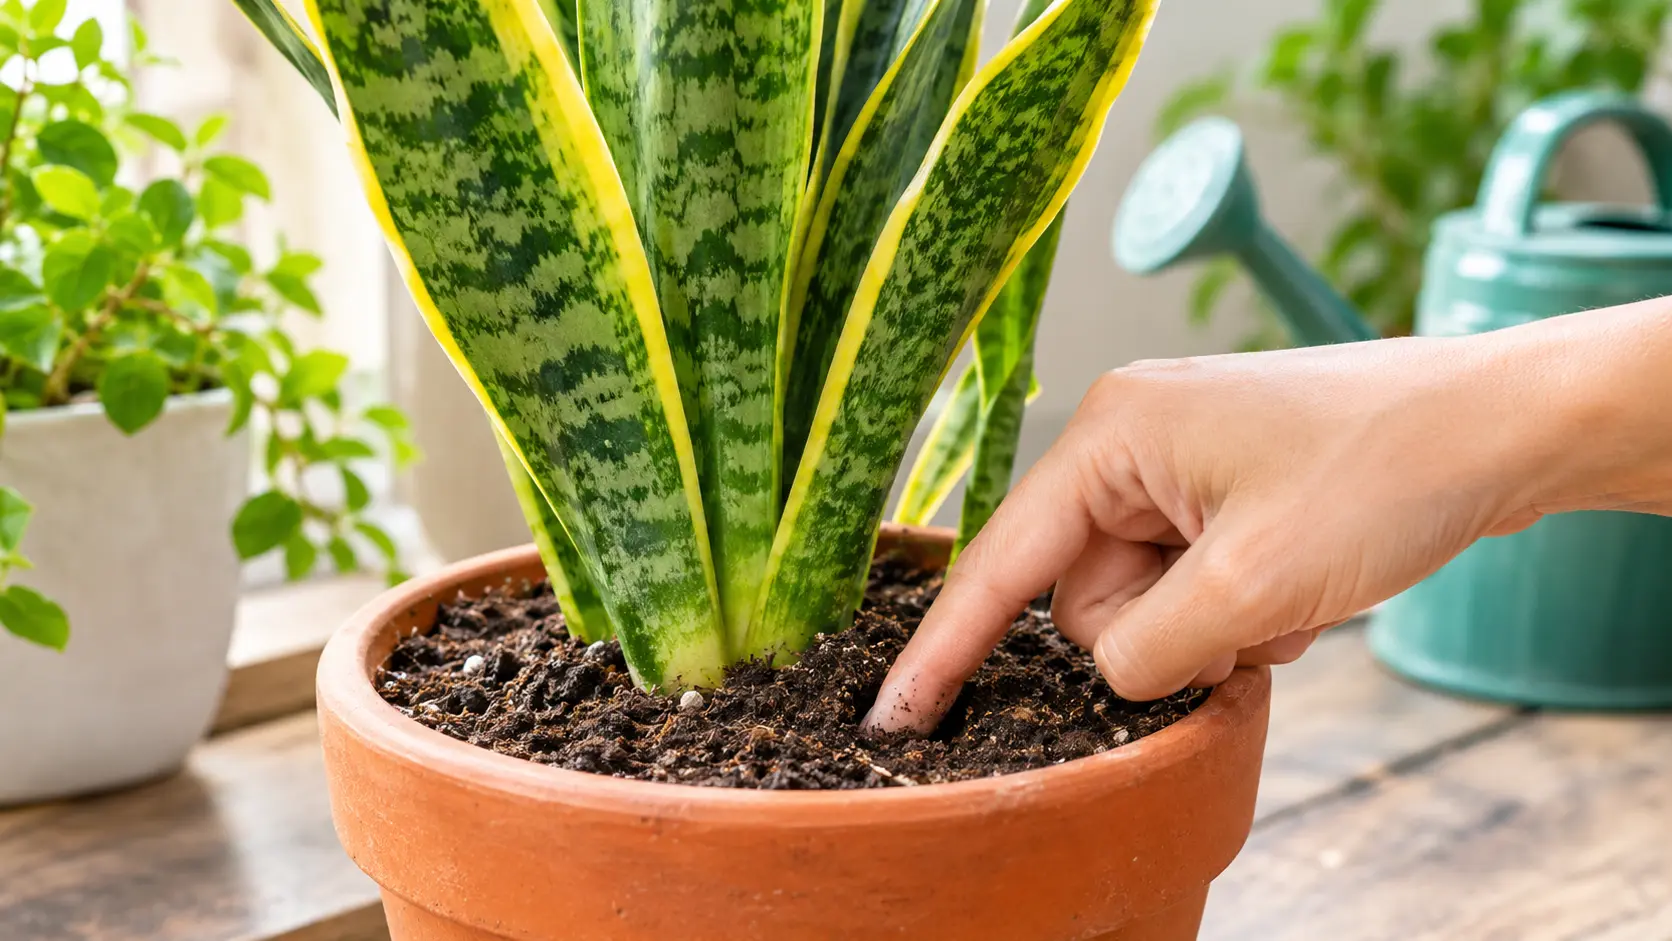
  1. Finger test. Push your finger about 2 inches (5 cm) into the soil. If it feels damp or cool, wait.
  2. Skewer test (for big pots). Push a wooden skewer or chopstick all the way to the bottom and pull it out. If dark, damp soil clings to it, wait. If it comes out clean and dry, it is time.
  3. Lift test. Pick up the pot right after watering, then again when the soil is dry. Dry soil feels much lighter, and you will learn this feel quickly.

A moisture meter can help, but treat it as a rough guide and confirm with your finger.

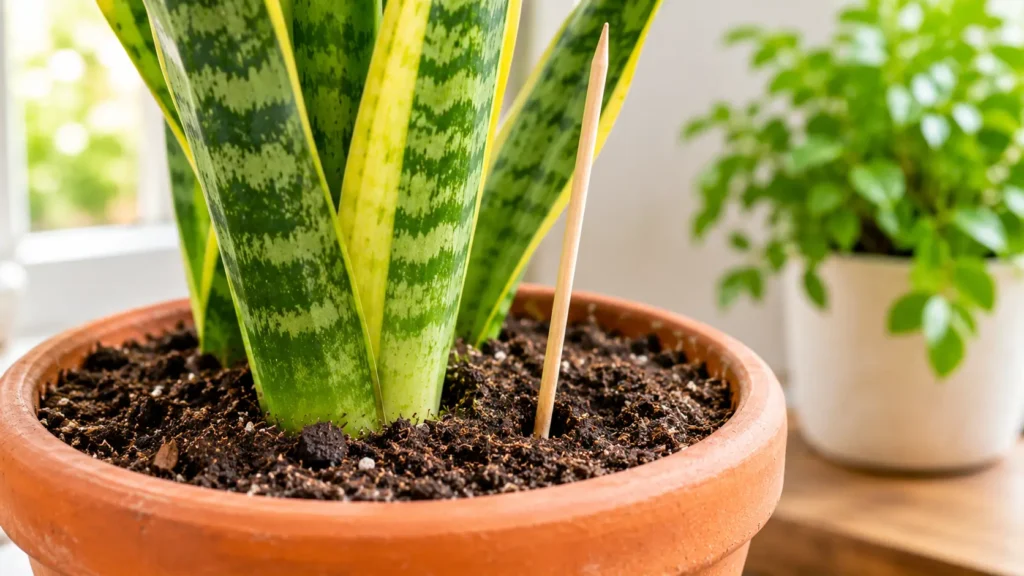
Wooden skewer pushed into snake plant soil to check dryness

What Changes Your Snake Plant Watering Schedule?

Two snake plants in two different homes can need very different watering. These are the main factors.

Light

Snake plants tolerate low light, but a plant in a dim corner uses water slowly, so the soil stays wet longer. More light means faster drying and more frequent watering.

How Often to Water a Snake Plant in a Small Pot vs a Large Pot

Small pots hold less soil, so they dry faster. Large pots stay damp for longer, especially if the plant is small for the pot. Material matters too: terracotta lets moisture escape through the walls and dries quickly, while plastic and glazed ceramic hold water longer. Whatever you choose, the pot must have a drainage hole.

Soil Mix

A fast-draining mix, such as a cactus or succulent mix or regular potting soil lightened with perlite or coarse sand, dries faster and protects the roots. Dense, heavy soil can stay wet for weeks.

Temperature, Humidity and Climate

Warm, dry air pulls moisture from the soil faster. Cool, humid rooms slow it down. A plant next to a heater or in an air-conditioned room can behave very differently from the same plant in a cool bedroom.

So when someone asks how often to water a snake plant, the honest answer starts with: it depends on your home. Use the table above as a starting point, then let the soil test decide.

How to Water a Snake Plant, Step by Step

  1. Check that the soil is fully dry using the tests above.
  2. Use room-temperature water. Very cold water can shock the roots.
  3. Water the soil, not the plant’s center. Pour slowly around the edge of the pot. Water that collects in the middle of the leaf rosette can cause rot.
  4. Water thoroughly. Keep going until water runs out of the drainage holes. A few small sips are worse than one deep drink, because they leave the lower roots dry and the top soil constantly damp.
  5. Let it drain. After 15 to 20 minutes, empty the saucer or decorative outer pot. Never leave the plant standing in water.
  6. Wait until the soil is completely dry again before the next watering.

Once you know how often to water a snake plant in your own home, note the date on a calendar or phone reminder. After a few rounds you will see your plant’s natural rhythm.

Bottom watering also works. Set the pot in a few inches of water for 10 to 20 minutes, then let it drain fully. Do not leave it sitting.

How Often to Water a Snake Plant in Winter (and Other Seasons)

In winter, snake plants grow very little. Light is weaker and rooms are often cooler, so the soil takes much longer to dry. Many owners water only every 4 to 6 weeks, and some less. Cold plus wet soil is the fastest route to root rot, so when in doubt, wait. Try to keep the plant away from cold windows and drafts, and avoid temperatures below about 50°F (10°C).

Two things to keep in mind, wherever you live:

  • Winter depends on your hemisphere. In the Northern Hemisphere it is roughly December to February. In the Southern Hemisphere it is roughly June to August.
  • Hot or tropical climates are different. If your home stays warm all year, such as in much of South Asia, the Middle East or Southeast Asia, your plant may keep growing and dry out quickly in hot months. You might water every 1 to 2 weeks then, and less during the cooler weeks. Heaters and air conditioning also change how fast soil dries, so keep testing the soil.

In spring and summer, when growth picks up, return to the regular 2 to 3 week pattern, again guided by the soil. In autumn, slow down gradually as days shorten.

Overwatered vs Underwatered Snake Plant: How to Tell

Snake plants show stress clearly, but the signs can look similar at first. Use this table.

What you seeOverwatered snake plantUnderwatered snake plant
LeavesYellowing, soft, collapsing or falling overWrinkled, curling, thinner and dull
Base of the plantSoft, mushy, dark; may smell badFirm
SoilStays wet for days; may smell sour; fungus gnatsVery dry, may pull away from the pot edge
How fast it happensOften fairly suddenlyGradually, over weeks

Overwatering is the far more common problem. If you are unsure, check the soil and the base of the plant before adding any water.

Overwatered snake plant with yellowing, collapsing leaves

What to Do If You Have Overwatered Your Snake Plant

  1. Stop watering and move the plant to bright, indirect light.
  2. Take the plant out of its pot and gently shake off the wet soil.
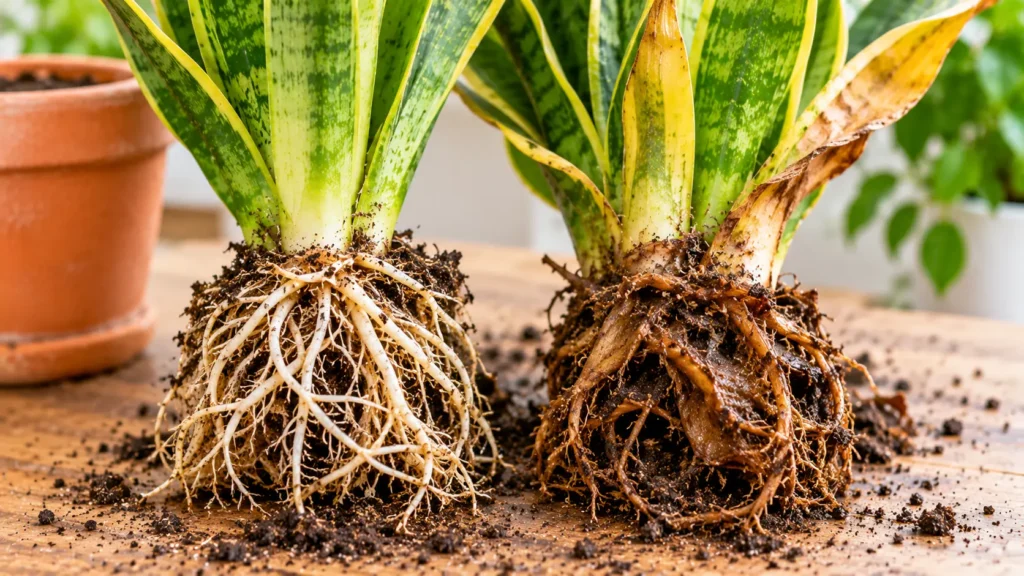
  3. Inspect the roots. Healthy roots are firm and light in color. Rotted roots are brown or black, soft and often smelly.
  4. Trim the rotten parts with clean scissors or a clean knife.
  5. Repot in fresh, fast-draining mix in a pot with drainage holes.
  6. Wait before watering again. Let the soil stay dry for a week or more, then return to the soil test.

If the base is mostly rotten, you may still save the plant by propagating a healthy leaf. Recovery is slow, so be patient.

Healthy firm roots next to rotted brown roots of a snake plant

Common Watering Mistakes

  • Following a fixed schedule no matter what. Rigid calendars are the main reason people get how often to water a snake plant wrong. Always test the soil first.
  • Using a pot without drainage holes. Water collects at the bottom and rots the roots.
  • Leaving water in the saucer or decorative pot. Empty it after watering.
  • Giving small sips often. Water deeply, then wait.
  • Not slowing down in winter. The plant needs far less water in cool, low-light months.
  • Using dense soil. Heavy mixes hold water too long. Choose a fast-draining mix.
  • Misting the leaves. Snake plants do not need it.

Frequently Asked Questions

Can a snake plant go a month without water?

Often, yes. Many snake plants are fine for several weeks, especially in winter or low light. Check the soil rather than counting days.

Should I mist my snake plant?

No. It does not need extra humidity, and water sitting on or between the leaves is not helpful.

How much water does a snake plant need each time?

Enough to wet the whole root ball so water drains out of the bottom, then let it dry completely before the next watering.

Do I water the leaves or the soil?

The soil. Pour around the edge of the pot and avoid filling the center of the leaf rosette.

Are snake plants safe for pets?

No. The ASPCA lists the snake plant as toxic to cats and dogs. It contains saponins, which can cause nausea, vomiting and diarrhea if chewed or eaten. Keep it out of reach, and if your pet eats some, contact your vet or the ASPCA Poison Control line.

Final Thoughts

Learning how often to water a snake plant comes down to one habit: check the soil, and water only when it is completely dry. Expect roughly every 2 to 3 weeks in the warm, bright months, and much less in winter or low light. If you only remember one thing, remember that this plant would rather be a little too dry than a little too wet.

Start with the soil test, adjust for your light, pot and climate, and your snake plant will reward you with years of steady growth.

Want help with other plant problems? Read our Why Are My Plant Leaves Turning Yellow? and Snake Plant Care Guide